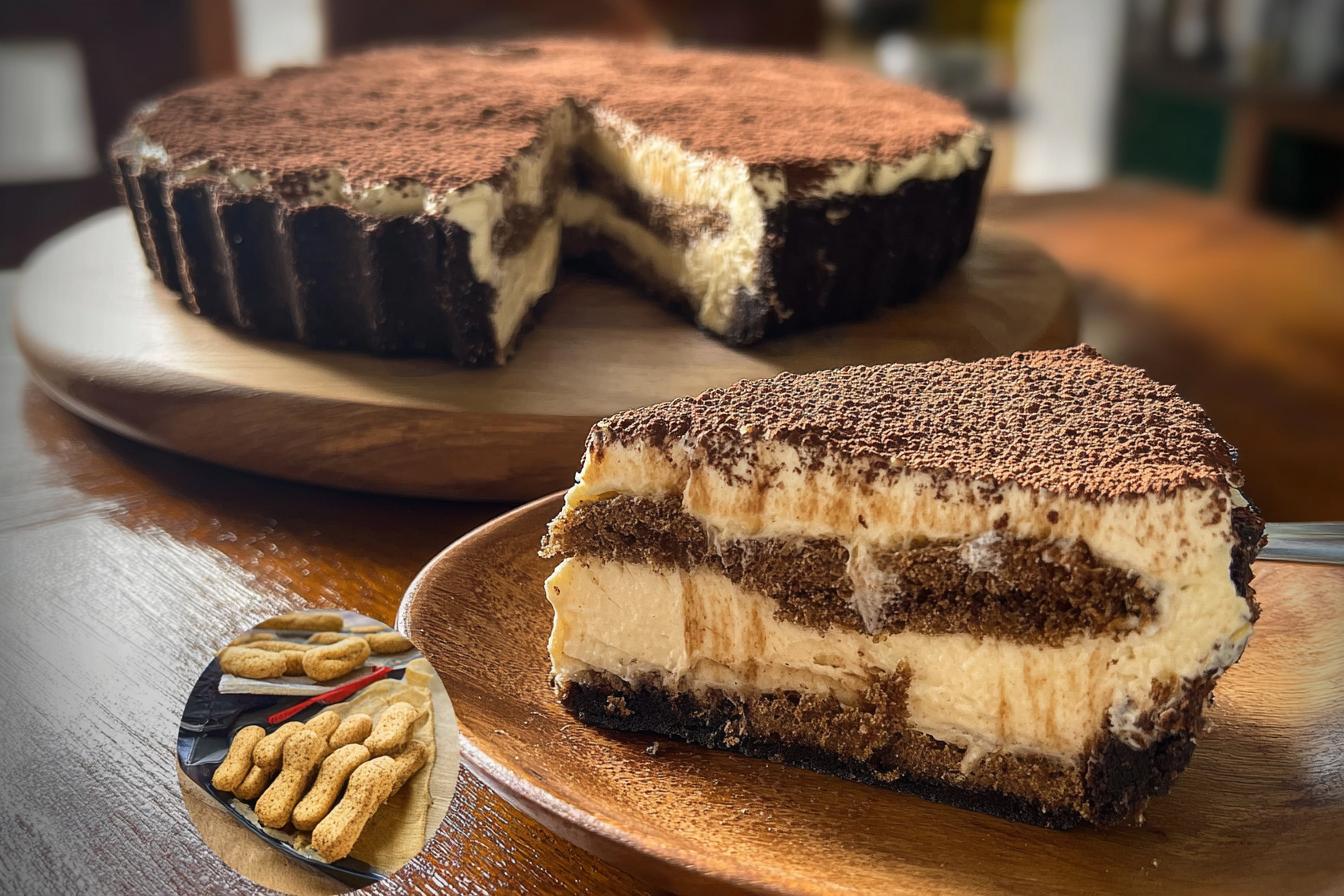
Oh my gosh, let me tell you about my tiramisu tart obsession! This isn’t just any dessert – it’s everything you love about classic tiramisu, but transformed into this gorgeous, sliceable tart that’ll make you look like a pastry pro. Picture this: a buttery chocolate crust that crumbles just right, layers of espresso-kissed ladyfingers, and that dreamy mascarpone filling that’s light as air yet so indulgent. I discovered this beauty when I was craving tiramisu but wanted something a little more special for a dinner party. Now? It’s my go-to when I need a showstopper dessert that’s secretly easy to make. The best part? That first bite where the coffee, chocolate and creamy filling all come together – pure magic!
Ingredients for Tiramisu Tart
Let me share the exact ingredients I’ve tested over and over to get this tiramisu tart just right. Trust me, using high-quality ingredients here makes all the difference – especially when it comes to the espresso and mascarpone!
Chocolate Crust Ingredients
- 24 chocolate sandwich cookies (like Oreos), finely crushed to crumbs (about 2 cups)
- 5 tablespoons unsalted butter, melted (but not hot!)
Mascarpone Filling Ingredients
- 16 ounces mascarpone cheese (cold from fridge)
- 8 ounces cream cheese, softened (this is crucial – microwave for 10 sec if needed)
- 3/4 cup powdered sugar (sifted if lumpy)
- 1 teaspoon pure vanilla extract (the good stuff!)
- 1 1/2 cups heavy whipping cream (very cold)
Coffee Layer Ingredients
- 1 cup freshly brewed espresso (or very strong coffee), completely cooled
- 2 tablespoons granulated sugar
- 18-20 ladyfingers (Savoiardi work best)
Topping Ingredients
- 2 tablespoons unsweetened cocoa powder (Dutch-processed ideal)
- 1 ounce dark chocolate, finely grated (optional but oh-so-worth it)
A quick tip from my kitchen disasters: measure your ingredients before starting! There’s nothing worse than realizing your cream cheese isn’t soft enough midway through. And don’t skip cooling the espresso – warm coffee makes soggy ladyfingers (learned that the hard way).
How to Make Tiramisu Tart
Alright, let’s dive into making this showstopper! I’ll walk you through each step just like I do when teaching friends in my kitchen. The secret? Taking it slow and enjoying the process – after all, the best desserts are made with love (and good espresso).
Prepare the Chocolate Crust
First things first – heat your oven to 350°F. Grab your chocolate cookie crumbs and melted butter (remember, not hot!). Mix them until they look like wet sand. Here’s my trick: press this heavenly mixture firmly into your tart pan, going up the sides just a bit. I use the bottom of a measuring cup to really pack it in. Bake for 8-10 minutes until it smells like chocolate heaven. Now the hard part – let it cool completely! I know it’s tempting, but warm crust + creamy filling = soggy disaster.
Make the Mascarpone Filling
While the crust cools, let’s make that dreamy filling. Beat the mascarpone and softened cream cheese together until smooth – no lumps allowed! Add powdered sugar and vanilla, then taste (quality control is important, right?). In another bowl, whip the heavy cream to stiff peaks. Here’s where patience pays off: gently fold the whipped cream into the cheese mixture. I do this in three additions, keeping it light and airy. The filling should be cloud-like when done!
Assemble the Tiramisu Tart
Now for the fun part! Mix your cooled espresso with sugar (it should be room temp – test with your finger). Quickly dip each ladyfinger – I mean 1-2 seconds quick! – and arrange them over the cooled crust. Spread half the mascarpone filling over the top. Repeat with another layer of dipped ladyfingers and the remaining filling. Pro tip: use an offset spatula to smooth the top like a pro. And whatever you do, don’t over-dip those ladyfingers – they drink up liquid faster than you’d think!
Chill and Serve
Pop your masterpiece in the fridge for at least 6 hours – overnight is even better. This waiting time is torture, I know, but it lets all those flavors become best friends. Right before serving, dust generously with cocoa powder through a fine sieve (tap it gently for even coverage). That optional grated dark chocolate? Now’s the time to shower it on! Slice with a warm knife for clean edges, and prepare for compliments.
Why You’ll Love This Tiramisu Tart
Okay, let me count the ways this tart will steal your heart (and probably your diet resolutions)! Every time I make this, I fall in love all over again – and here’s why you will too:
- Decadent layers that make every bite an adventure – crunchy chocolate crust, coffee-kissed ladyfingers, and that cloud-like mascarpone filling
- Make-ahead magic – actually gets better as it chills, perfect for stress-free entertaining (no last-minute dessert panic!)
- The perfect coffee-chocolate balance – not too sweet, not too bitter, just that glorious harmony that makes tiramisu legendary
- Looks fancy but secretly easy – that dusted cocoa top makes everyone think you slaved for hours
- Crowd-pleaser that works for dinner parties AND casual get-togethers (my book club loses their minds every time I bring this)
Honestly, the hardest part is waiting those 6 hours while it chills – but trust me, it’s worth every agonizing minute!
Tips for the Perfect Tiramisu Tart
Listen, I’ve made every possible mistake with this tart so you don’t have to! Here are my hard-earned secrets to tiramisu tart success:
Keep That Espresso Cool
The number one rookie mistake? Using warm espresso. I learned this the messy way when my ladyfingers turned to mush. Always let your espresso cool completely – I stick mine in the fridge for about 20 minutes while prepping other ingredients. Test it with your finger – it should feel room temp, not even slightly warm.
The Art of Ladyfinger Dipping
“Quick dip and out!” is my mantra. Literally count “one Mississippi” as you dip each ladyfinger. They’re like sponges – too long and they’ll fall apart in your tart. Lay them gently in a single layer – no overlapping or you’ll get soggy spots.
Folding Like a Pro
When combining the whipped cream with mascarpone, fold gently with a silicone spatula. I do it in three additions, scraping from the bottom up. Stop the moment no white streaks remain. Overmixing deflates all that lovely air – and we want cloud-like filling, not dense paste!
Crust is King
That chocolate crust needs to be completely cool before adding any filling. I let mine sit for at least 30 minutes – sometimes blowing on it impatiently. Press the crumbs firmly into the pan – loose crumbs lead to crumbling slices later. And don’t skip baking the crust – raw cookie crumbs just don’t have the same magic.
Grate Chocolate Fresh
Pre-grated chocolate? Not in my kitchen! It contains anti-caking agents that dull the flavor. I keep a block of good dark chocolate (70% works great) and use a microplane right before serving. The fine flakes melt beautifully on your tongue with each bite.
One last tip: resist the urge to peek while it’s chilling! That 6-hour wait is crucial for setting the layers. I set a timer and distract myself (usually by licking the mixing bowls clean). When that timer dings? Pure dessert bliss awaits!
Ingredient Substitutions & Notes
Okay, let’s talk substitutions – because we’ve all been halfway through a recipe only to realize we’re missing something! Here are my tested swaps that still keep this tiramisu tart amazing:
When You Don’t Have Espresso
No espresso machine? No problem! Strong brewed coffee works beautifully here. I use 2 tablespoons of instant espresso powder dissolved in 1 cup hot water (then cooled). Regular coffee works too – just make it double strength. The flavor won’t be quite as robust, but it’ll still be delicious.
Ladyfinger Options
Those Savoiardi ladyfingers can be tricky to find sometimes. In a pinch, I’ve used:
- Gluten-free ladyfingers (check the texture – some brands hold up better than others)
- Pound cake slices (about 1/2-inch thick, briefly toasted)
- Thin sponge cake layers (cut to fit your tart pan)
Just remember – whatever you use, keep that dipping quick! Nobody wants a mushy tart.
Mascarpone Make-Do’s
Can’t find mascarpone? I’ve been there! Try this combo:
- Equal parts cream cheese and heavy cream (whipped together)
- Or ricotta cheese blended smooth with a touch of extra powdered sugar
It won’t be exactly the same, but it’ll still be creamy and dreamy. Just avoid low-fat versions – we want that rich texture!
Chocolate Crust Shortcuts
That chocolate cookie crust is life-changing, but in a real pinch:
- Use graham crackers with 1 tablespoon cocoa powder mixed in
- Pre-made chocolate cookie crust (just don’t bake it again!)
Pro tip: If using sandwich cookies, you can leave the filling in – it adds extra richness!
Measuring Matters
A quick note about those cookie crumbs – when I say “finely crushed,” I mean it should look like dark brown sand. Pack it lightly into your measuring cup (no tamping down). For the powdered sugar, I spoon it into the cup and level off – no packing needed. And that heavy cream? Make sure it’s cold cold cold before whipping – I even chill my mixing bowl sometimes!
Remember – baking is part science, part art. These subs have worked for me, but your perfect version might need a little tweaking. That’s the fun of cooking! The most important thing? Enjoy the process and that first heavenly bite.
Storage & Reheating
Here’s the beautiful thing about this tiramisu tart – it actually gets better as it sits! But proper storage is key to keeping that perfect texture. I always make mine the day before serving because that overnight chill time works magic on the flavors.
To store, simply cover the tart tightly with plastic wrap – I press it right against the surface to prevent any air from drying out that gorgeous mascarpone layer. It’ll keep beautifully in the fridge for up to 3 days (if it lasts that long in your house – mine never does!).
Now, reheating? Don’t even think about it! This tart is meant to be served chilled straight from the fridge. The layers hold their shape perfectly when cold, and that cool temperature balances the richness. If you try to warm it up, you’ll end up with a sad, melty mess (trust me, I learned this lesson the hard way during a misguided microwave experiment).
One pro tip: if you need to transport this beauty, keep it in a cooler or insulated bag. Summer picnics are perfect for this tart, but you don’t want it sitting in the sun. I bring mine in the tart pan with the plastic wrap still on, then do the final cocoa dusting right before serving for that fresh-baked look.
Tiramisu Tart FAQ
Okay, let’s tackle those burning questions I always get about this tart! I’ve made every possible mistake so you don’t have to – consider this your tiramisu tart troubleshooting guide.
Can I freeze tiramisu tart?
Oh honey, I wish! But no – freezing turns our beautiful creamy layers into a sad, grainy mess. The mascarpone separates when thawed, and those perfect ladyfinger layers turn mushy. If you need to prep ahead, just make it 1-2 days in advance and keep it refrigerated. That overnight chill actually improves the flavors!
Can I use instant coffee instead of espresso?
Absolutely! I’ve been there when the espresso machine broke right before a dinner party. Mix 2 tablespoons of good-quality instant coffee (not the flavored kind) with 1 cup hot water, then cool completely. The flavor won’t be quite as deep and rich, but it’ll still be delicious. Just don’t tell my Italian grandmother I said that!
How do I prevent a soggy crust?
Two words: COMPLETELY COOL. I can’t stress this enough – that chocolate crust must be room temp before any filling touches it. I usually bake mine first thing, then let it cool while prepping other ingredients (about 30 minutes). Also, don’t over-dip those ladyfingers – quick in and out! They’ll absorb moisture from the filling as it chills.
Can I make this gluten-free?
You bet! Swap regular ladyfingers for gluten-free ones (check the texture – some brands hold up better than others). For the crust, use gluten-free chocolate cookies. Everything else is naturally gluten-free! Just be sure to check all your labels if you’re serving someone with celiac disease.
Why does my filling look lumpy?
Ah, the dreaded lumpy filling! Here’s what’s happening: your cream cheese wasn’t soft enough. I microwave mine for 10 seconds if I forgot to take it out early. Also, make sure to beat the mascarpone and cream cheese together first until completely smooth before adding other ingredients. No shortcuts here – those lumps won’t disappear once the whipped cream goes in!
Remember – even when things go slightly wrong, it’ll still taste amazing. My first attempt looked like a dessert crime scene but disappeared faster than you’d believe! The most important ingredient is always love (and good coffee).
Nutritional Information
Now, let’s chat about what’s actually in this heavenly dessert – because let’s be real, we’re all going to enjoy it regardless, but it’s good to know what you’re indulging in! Keep in mind these values are estimates and can vary based on the specific brands and measurements you use. Here’s the breakdown per generous slice:
- Calories: 460 (worth every single one!)
- Fat: 32g (that luxurious mascarpone and cream at work)
- Saturated Fat: 19g (the good kind that makes it so creamy)
- Carbohydrates: 35g (mostly from those dreamy ladyfingers)
- Sugar: 25g (but balanced perfectly with the coffee bitterness)
- Protein: 7g (who knew dessert could pack protein?)
- Cholesterol: 95mg
- Sodium: 180mg
- Fiber: 2g (thank you, chocolate crust!)
Now, I’m no nutritionist – I’m just a passionate baker who occasionally stares at nutrition labels while eating her third piece. The truth? This tart is meant to be savored, not counted. Each bite delivers that perfect combination of creamy, coffee-kissed bliss that makes life sweeter. And remember, sharing is caring – cutting slightly smaller slices means everyone gets to enjoy while keeping the numbers in check!
Tell Me About Your Tiramisu Tart Adventure!
Alright, my fellow dessert lovers – now it’s your turn! I want to hear all about your tiramisu tart triumphs (or even the hilarious kitchen disasters – we’ve all been there!). Did you add your own twist with a splash of liqueur? Maybe you found the perfect ladyfinger dipping technique? Whatever your experience, share it below!
Leave a rating to let me know how it turned out for you – those little stars make my day! And if you snapped a photo of your masterpiece (or that first glorious slice), I’d absolutely love to see it. There’s nothing more inspiring than seeing everyone’s creative takes on this recipe.
Questions? Fire away in the comments! I read every single one and love helping troubleshoot. After all, we’re in this delicious dessert journey together – let’s make every tiramisu tart as amazing as it can be!
Print
Irresistible Tiramisu Tart: 5-Star Recipe You’ll Crave
- Total Time: 6 hours 40 minutes
- Yield: 8 servings 1x
- Diet: Vegetarian
Description
A rich and creamy tiramisu tart with layers of chocolate crust, coffee-soaked ladyfingers, and mascarpone filling.
Ingredients
- For the chocolate crust:
- 24 chocolate sandwich cookies, finely crushed
- 5 tablespoons unsalted butter, melted
- For the mascarpone filling:
- 16 ounces mascarpone cheese
- 8 ounces cream cheese, softened
- 3/4 cup powdered sugar
- 1 teaspoon vanilla extract
- 1 1/2 cups heavy whipping cream
- For the coffee layer:
- 1 cup brewed espresso or strong coffee, cooled
- 2 tablespoons granulated sugar
- 18 to 20 ladyfingers
- For topping:
- 2 tablespoons unsweetened cocoa powder
- 1 ounce dark chocolate, finely grated (optional)
Instructions
- Preheat your oven to 350°F.
- In a medium bowl, mix the crushed chocolate cookies with melted butter until the mixture looks like wet crumbs.
- Press the mixture firmly into the bottom and sides of a tart pan.
- Bake for 8 to 10 minutes, then let the crust cool completely.
- In a large mixing bowl, beat the mascarpone, cream cheese, powdered sugar, and vanilla extract until smooth and creamy.
- In a separate bowl, whip the heavy cream until stiff peaks form.
- Gently fold the whipped cream into the mascarpone mixture until light and fluffy.
- In a shallow bowl, stir together the cooled espresso and granulated sugar.
- Dip each ladyfinger quickly into the coffee mixture, making sure not to soak them too long.
- Spread a layer of mascarpone filling over the cooled crust.
- Arrange a layer of dipped ladyfingers over the filling.
- Add another layer of mascarpone filling and smooth the top.
- Repeat with another layer of dipped ladyfingers and the remaining mascarpone filling.
- Cover and chill for at least 6 hours, or until fully set.
- Before serving, dust generously with cocoa powder and top with finely grated dark chocolate if desired.
- Slice and serve chilled.
Notes
- Make sure the espresso or coffee is cooled before dipping the ladyfingers.
- Do not over-soak the ladyfingers to prevent a soggy tart.
- Chill for at least 6 hours for best results.
- Grated dark chocolate adds extra richness but is optional.
- Prep Time: 30 minutes
- Cook Time: 10 minutes
- Category: Dessert
- Method: Baking, Chilling
- Cuisine: Italian
Nutrition
- Serving Size: 1 slice
- Calories: 460
- Sugar: 25g
- Sodium: 180mg
- Fat: 32g
- Saturated Fat: 19g
- Unsaturated Fat: 10g
- Trans Fat: 0g
- Carbohydrates: 35g
- Fiber: 2g
- Protein: 7g
- Cholesterol: 95mg
Keywords: tiramisu tart, mascarpone tart dessert, espresso dessert recipe, chocolate crust tart, ladyfinger dessert, coffee cream tart