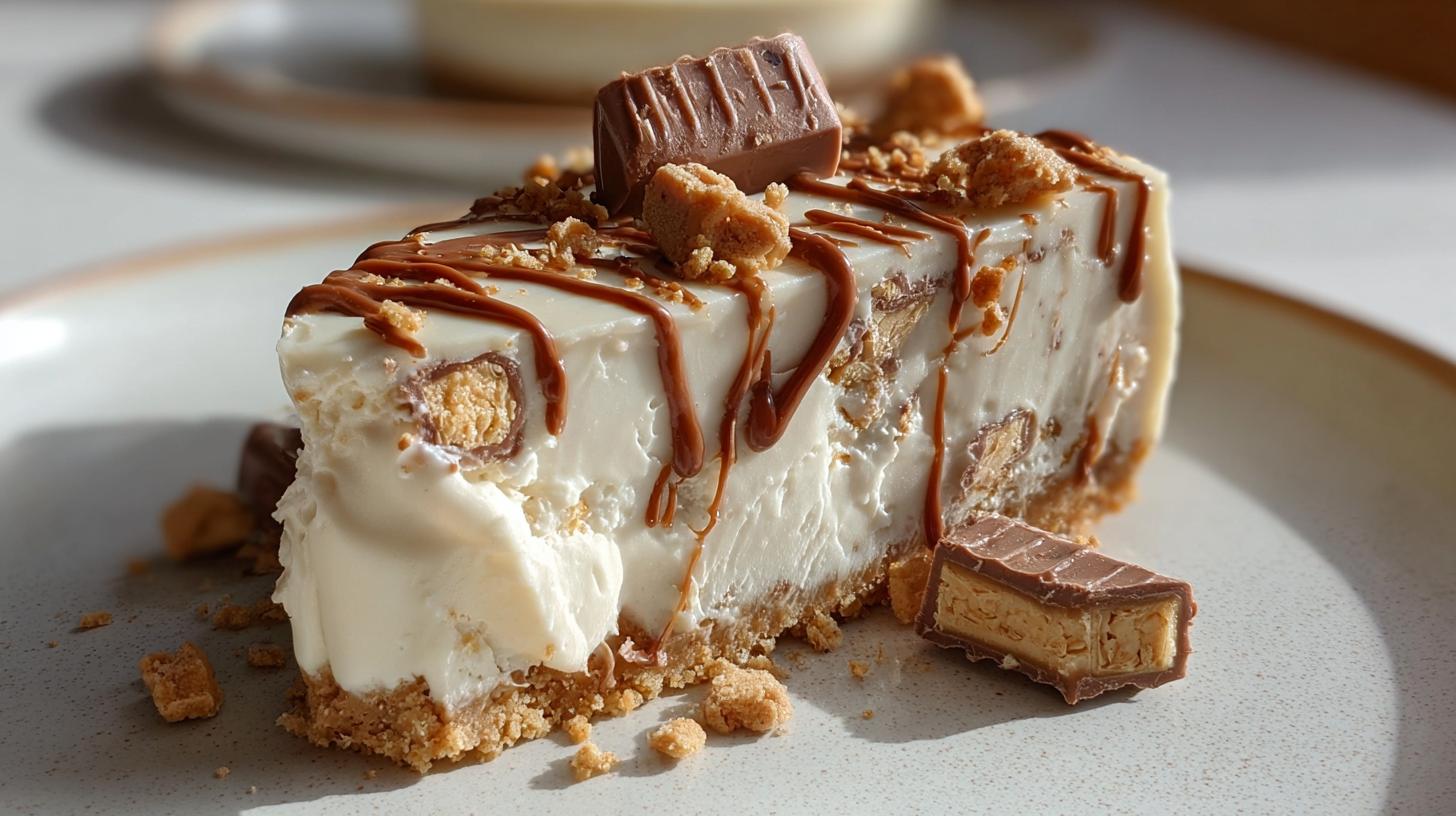
Oh my goodness, let me tell you about my absolute favorite dessert to whip up when I need something decadent but don’t want to turn on the oven – this heavenly no-bake Kinder Bueno cheesecake! I first made it for my niece’s birthday party when I forgot to preheat the oven (oops!), and now it’s become our family’s most requested treat. The combination of creamy white chocolate filling with those crispy hazelnut wafer pieces? Pure magic! What I love most is how effortlessly impressive it looks – like you spent hours in the kitchen when really, it comes together in minutes (plus some chilling time, but we’ll get to that). Trust me, once you try this rich, dreamy dessert with its buttery crust and silken filling studded with Kinder Bueno chunks, you’ll never want to make a regular cheesecake again!
Why You’ll Love This No-Bake Kinder Bueno Cheesecake
Let me count the ways this dessert will become your new best friend! First off – no oven means no stress about overbaking or cracked tops. Just mix, chill, and wow your guests. Here’s what makes it so special:
- Dreamy texture: That whipped cream folded into cream cheese creates clouds of creamy perfection
- Hazelnut heaven: The chocolate hazelnut spread adds such depth to both crust and filling
- Crispy surprises: Every bite has those addictive Kinder Bueno wafer bits
- Make-ahead magic: Tastes even better after overnight chilling (if you can wait that long!)
- Foolproof: Even beginner bakers nail this one – my 12-year-old niece makes it solo now!
Seriously, the hardest part is not eating all the Kinder Bueno bars before they make it into the batter!
Ingredients for No-Bake Kinder Bueno Cheesecake
Okay, let’s talk ingredients – and I mean the good stuff! This cheesecake comes together with simple pantry items plus those magical Kinder Bueno bars. I always make sure everything’s at the right temperature before starting – cold cream for whipping, room temp cream cheese (trust me, lumps are no fun!), and slightly cooled melted chocolate. Here’s exactly what you’ll need:
For the crust:
- 2 cups vanilla wafer crumbs – I use Nilla wafers, but graham crackers work too if that’s what you’ve got
- 6 tablespoons unsalted butter, melted (and yes, it must be unsalted – we control the salt level here!)
- 2 tablespoons chocolate hazelnut spread – this is our secret weapon for extra flavor
For the luscious filling:
- 16 ounces cream cheese, softened (leave it out for 30 minutes – no shortcuts!)
- 1 cup powdered sugar – sift it if you’re fancy, I usually don’t bother
- 1 teaspoon vanilla extract – the real stuff, please
- 1/3 cup chocolate hazelnut spread – more nutty goodness
- 6 ounces white chocolate, melted and slightly cooled (don’t add it hot or it’ll seize the cream cheese)
- 1 1/4 cups cold heavy whipping cream – straight from the fridge is crucial
- 4 Kinder Bueno bars, chopped into bite-sized pieces (try not to eat them all while chopping)
For that gorgeous topping:
- 6 ounces white chocolate – yes, more! It’s worth it
- 1/4 cup heavy cream – for making the silky glaze
- 2 tablespoons chocolate hazelnut spread – swirled through the topping
- 2 Kinder Bueno bars, crushed or chopped for decoration
See? Nothing too crazy – just quality ingredients that transform into something magical. Now let’s make some cheesecake!
How to Make No-Bake Kinder Bueno Cheesecake
Alright, let’s get our hands dirty (well, not literally – we want clean hands for this)! This cheesecake comes together in three simple parts: the crust, the dreamy filling, and that gorgeous topping. Follow these steps and you’ll have dessert magic in no time!
Preparing the Crust
First things first – grab your favorite 8-inch square pan or loaf pan and line it with parchment paper (trust me, this makes removal SO much easier). Now, let’s make that buttery base:
- In a medium bowl, mix your vanilla wafer crumbs with the melted butter and chocolate hazelnut spread until it looks like wet sand. You want every crumb coated – this is flavor town!
- Dump the mixture into your prepared pan and press it down firmly with the back of a spoon or your fingers. I mean really press – you want it compacted so it holds together when slicing later.
- Pop it in the fridge for at least 15 minutes to set. This quick chill prevents a crumbly disaster when we add the filling.
Making the Cheesecake Filling
Now for the good stuff – that cloud-like filling studded with Kinder Bueno pieces:
- In a large bowl, beat your softened cream cheese until it’s completely smooth. No lumps allowed! This takes about 2 minutes with a hand mixer.
- Add the powdered sugar, vanilla, chocolate hazelnut spread, and slightly cooled melted white chocolate. Beat again until everything is fully incorporated – scrape down the sides as needed.
- In another bowl, whip your cold heavy cream to stiff peaks. Don’t rush this – properly whipped cream gives that airy texture we love.
- Now, gently fold the whipped cream into the cream cheese mixture. I do this in three additions, folding just until combined each time. Overmixing = dense cheesecake = sad faces.
- Finally, fold in those chopped Kinder Bueno pieces. Try to distribute them evenly so every bite gets some crispy wafer goodness!
Assembling and Topping
Almost there! Let’s bring it all together:
- Spoon your luscious filling over the chilled crust and smooth the top with an offset spatula or the back of a spoon.
- Cover with plastic wrap (press it right onto the surface to prevent skin forming) and refrigerate for at least 6 hours, though overnight is better if you can wait!
- For the topping: Heat your heavy cream until warm (not boiling), then pour it over the white chocolate. Let it sit for 2 minutes before stirring into a smooth ganache.
- Stir in the chocolate hazelnut spread for that beautiful swirl effect, then let it cool slightly so it’s pourable but not too runny.
- Remove your set cheesecake from the fridge, pour over the topping, and sprinkle with crushed Kinder Bueno pieces.
- Chill for another 20-30 minutes to set the topping before slicing. Pro tip: Dip your knife in hot water and wipe dry between cuts for picture-perfect slices!
See? Easy peasy! Now try not to eat the whole pan in one sitting – though I won’t judge if you do!
Tips for the Best No-Bake Kinder Bueno Cheesecake
After making this cheesecake more times than I can count (okay fine, I’ve kept track – 27 times last year alone!), I’ve learned all the little tricks that take it from good to “oh-my-gosh-give-me-the-recipe” amazing:
- Temperature matters! Cold cream whips better, but room temp cream cheese blends smoother. Plan ahead!
- Chop those Kinder Bueno bars evenly – I aim for pea-sized pieces so you get perfect crunch in every bite without giant chunks.
- Press, don’t pat the crust – use firm pressure with your palms to really compact those crumbs.
- Fold gently when adding whipped cream – overmixing makes the filling dense instead of cloud-like.
- Patience is key – that overnight chill makes ALL the difference in texture and flavor.
Follow these simple tricks and you’ll have cheesecake perfection every single time!
Variations of No-Bake Kinder Bueno Cheesecake
Oh, the possibilities! While I adore the original version, sometimes I like to mix things up. Try swapping the vanilla wafer crust for crushed Oreos (hello, chocolate overload!) or use dark chocolate in the glaze for contrast. For nut-free friends, skip the hazelnut spread and add extra melted chocolate instead. My cousin swears by adding a layer of caramel sauce between the crust and filling – messy but worth it! The beauty of this recipe is how easily you can make it your own while keeping that irresistible Kinder Bueno magic.
Serving and Storing No-Bake Kinder Bueno Cheesecake
Here’s the best part – making this beauty look as good as it tastes! I love serving slices on little dessert plates with extra crushed Kinder Bueno sprinkled around the edges. A dollop of whipped cream never hurts either! For leftovers (if you’re lucky enough to have any), just cover the pan tightly with plastic wrap or transfer slices to an airtight container. It keeps beautifully in the fridge for up to 3 days – though in my house, it never lasts that long! Pro tip: The flavors actually deepen overnight, so don’t be afraid to make it a day ahead.
Nutritional Information for No-Bake Kinder Bueno Cheesecake
Now, let’s be real – this is an indulgent treat, not health food! But because I know some of you like to keep track (or need to justify that second slice), here’s the scoop per serving. Remember, these are estimates – exact numbers vary based on your specific ingredients:
- Calories: 470
- Fat: 32g (18g saturated)
- Carbohydrates: 42g
- Sugar: 35g
- Protein: 6g
My philosophy? Life’s too short not to enjoy dessert – just balance it with veggies later! The joy this cheesecake brings is worth every delicious calorie.
Frequently Asked Questions About No-Bake Kinder Bueno Cheesecake
I get so many questions about this recipe – here are the ones that pop up most often!
Can I freeze this cheesecake?
Absolutely! Wrap individual slices tightly in plastic wrap, then foil, and freeze for up to 2 months. Thaw overnight in the fridge – the texture stays perfect!
What can I use instead of chocolate hazelnut spread?
If you’re not a Nutella fan, try peanut butter (the creamy kind) or even cookie butter for a different twist. Just skip it altogether if you prefer – the white chocolate and Kinder Bueno still shine!
Why does my filling seem runny?
Two likely culprits: cream cheese wasn’t fully softened before mixing, or the whipped cream wasn’t stiff enough. Always start with cold cream and beat until it holds peaks!
Can I make this in a springform pan?
You bet! Just line the bottom with parchment for easy removal. The square pan gives nice thick slices, but round works beautifully too.
How far in advance can I make this?
It keeps wonderfully for 3 days in the fridge – the flavors actually improve! Just add the topping and garnish the day you plan to serve.
Amazing No-Bake Kinder Bueno Cheesecake: 3 Layers of Bliss
- Total Time: 6 hours 25 minutes
- Yield: 9 servings 1x
- Diet: Vegetarian
Description
A creamy no-bake cheesecake with Kinder Bueno pieces and white chocolate hazelnut flavors.
Ingredients
- For the crust:
- 2 cups vanilla wafer or graham cracker crumbs
- 6 tablespoons unsalted butter, melted
- 2 tablespoons chocolate hazelnut spread
- For the filling:
- 16 ounces cream cheese, softened
- 1 cup powdered sugar
- 1 teaspoon vanilla extract
- 1/3 cup chocolate hazelnut spread
- 6 ounces white chocolate, melted and slightly cooled
- 1 1/4 cups cold heavy whipping cream
- 4 Kinder Bueno bars, chopped
- For the topping:
- 6 ounces white chocolate
- 1/4 cup heavy cream
- 2 tablespoons chocolate hazelnut spread
- 2 Kinder Bueno bars, chopped or crushed for garnish
Instructions
- Line an 8-inch square pan or loaf pan with parchment paper.
- In a medium bowl, mix the cookie crumbs, melted butter, and chocolate hazelnut spread until the crumbs are evenly coated.
- Press the crust mixture firmly into the bottom of the pan. Chill for 15 minutes.
- In a large mixing bowl, beat the cream cheese until smooth and creamy.
- Add the powdered sugar, vanilla extract, chocolate hazelnut spread, and melted white chocolate. Beat until fully combined.
- In a separate bowl, whip the cold heavy cream until stiff peaks form.
- Gently fold the whipped cream into the cheesecake mixture until light and fluffy.
- Fold in the chopped Kinder Bueno pieces.
- Spoon the filling over the chilled crust and smooth the top.
- Cover and refrigerate for at least 6 hours, or overnight, until fully set.
- To make the topping, heat the heavy cream until warm. Pour it over the white chocolate and let it sit for 2 minutes. Stir until smooth, then mix in the chocolate hazelnut spread.
- Let the topping cool slightly, then pour it over the chilled cheesecake.
- Garnish with chopped or crushed Kinder Bueno pieces.
- Chill for another 20 to 30 minutes before slicing and serving.
Notes
- Use a sharp knife dipped in hot water for clean slices.
- Store leftovers covered in the refrigerator for up to 3 days.
- Prep Time: 25 minutes
- Cook Time: 0 minutes
- Category: Dessert
- Method: No-Bake
- Cuisine: International
Nutrition
- Serving Size: 1 slice
- Calories: 470
- Sugar: 35g
- Sodium: 180mg
- Fat: 32g
- Saturated Fat: 18g
- Unsaturated Fat: 10g
- Trans Fat: 0g
- Carbohydrates: 42g
- Fiber: 1g
- Protein: 6g
- Cholesterol: 65mg
Keywords: no-bake Kinder Bueno cheesecake, white chocolate hazelnut dessert, easy no-bake cheesecake, creamy wafer cheesecake, make-ahead chocolate dessert, Kinder Bueno dessert recipe