Oh, let me tell you about my absolute go-to party lifesaver – this stunning layered fruit salad! It’s the first thing I make when summer hits and the backyard gatherings start up. I can’t count how many times this colorful masterpiece has saved me when I needed a quick, impressive dessert that everyone from kids to grandparents would devour. The best part? It’s just fresh fruit artfully arranged – no oven required! I first made this for my niece’s graduation party, and now it’s requested at every family event. When the temperatures rise and you need something cool, bright, and bursting with natural sweetness, this is the dessert that never lets me down.
Why You’ll Love This Layered Fruit Salad
Listen, this isn’t just any fruit salad—it’s a total showstopper! Here’s why it’s my forever favorite:
- Zero oven time – Seriously, who wants to bake when it’s 90 degrees outside?
- Party magic – That gorgeous rainbow layers gets “oohs” and “aahs” every time I bring it out
- Customizable – Swap fruits based on what’s ripe or on sale (my secret? More berries = more wow factor)
- Fresh as a summer breeze – The mint garnish makes it taste even cooler somehow
- No fuss – Chop, layer, chill… then just watch it disappear!
Trust me, once you make this once, you’ll be hooked. It’s like edible confetti in a bowl!
The Fruits You’ll Need for Picture-Perfect Layers
Okay, let’s talk fruit! The magic of this salad is in the rainbow of colors and textures, so I’m pretty particular about my lineup. You’ll want about 10 cups total – but no stress, just grab what looks freshest at the market. Here’s my dream team:
- Tropical base: 2 cups fresh pineapple (cut into ½-inch cubes – no juice!)
- Zesty green layer: 2 cups kiwi (peeled and diced – about 4 medium)
- Juicy pops: 1 ½ cups each red and green grapes (halved – seedless please!)
- Berry bonanza: 1 ½ cups each blackberries, strawberries (hulled & chopped), blueberries, and raspberries
- Citrus sunshine: 1 ½ cups mandarin oranges (drained well if canned)
- The finisher: Fresh mint leaves – about 10 for garnish
Pro tip: Wash all berries last-minute and pat dry – nobody likes a soggy layer!
How to Make Layered Fruit Salad
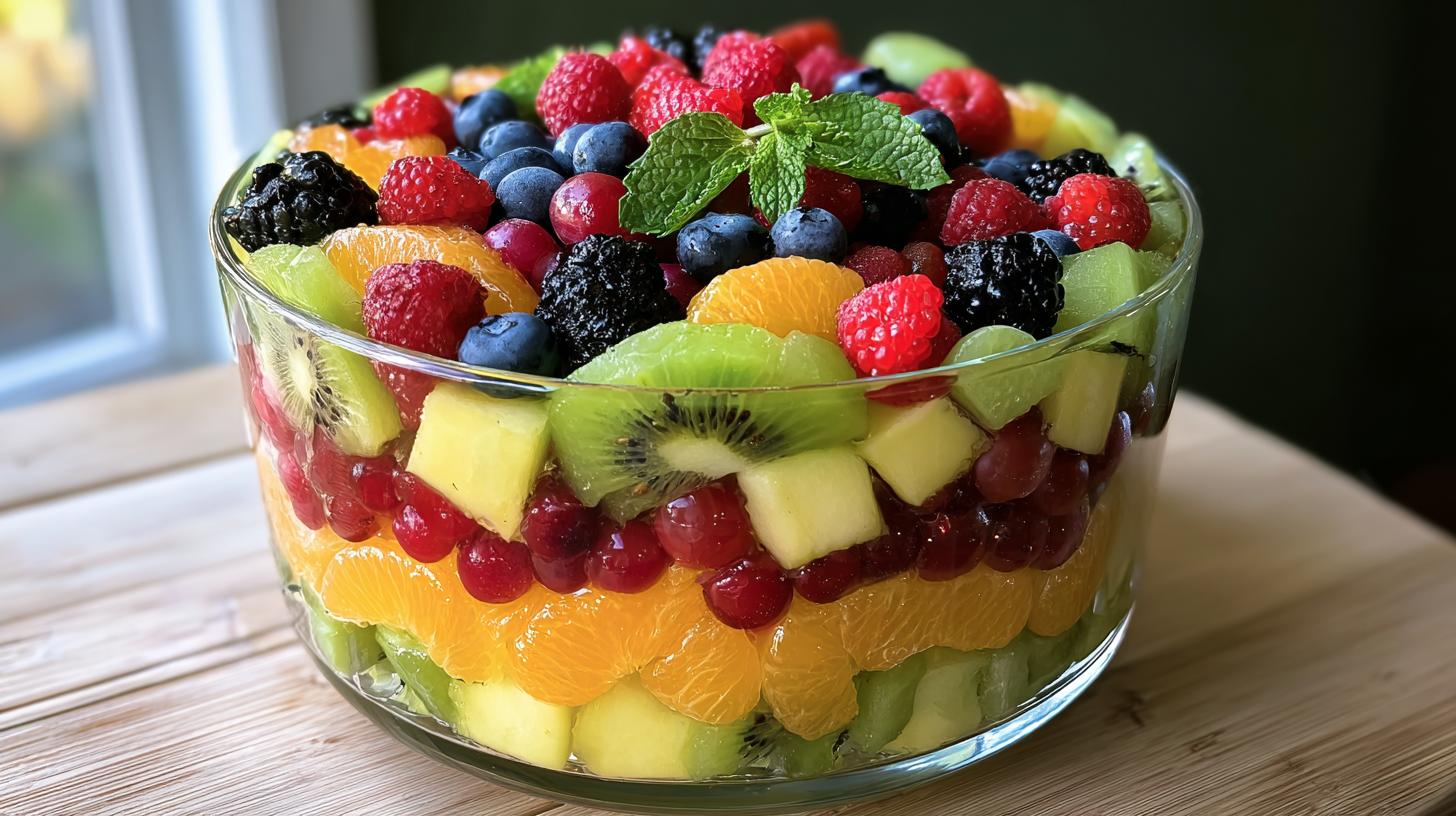
Alright, let’s get layering! This is where the magic happens – turning ordinary fruit into a jaw-dropping centerpiece. I always use my trusty glass trifle bowl (a $5 thrift store find!) because half the fun is seeing those gorgeous colors peek through. Here’s exactly how I build it:
Step 1: Prepare the Base Layer
Start with your pineapple cubes – they’re the perfect sturdy foundation. Spread them evenly across the bottom of your clear bowl. I like to press them down gently with clean fingers (wash first!) to create a flat surface. The pineapple’s natural sweetness and slight acidity balance all the other flavors beautifully. Plus, that bright yellow peeking through the glass? Instant summer vibes!
Step 2: Build Subsequent Layers
Now the fun begins! Layer in this exact order for maximum visual impact:
- Kiwi (that vibrant green makes your eyes pop)
- Red grapes (juicy bursts of color)
- Blackberries (deep purple for contrast)
- Strawberries (classic red that everyone loves)
- Green grapes (cool, crisp layer)
- Blueberries (little blue jewels)
- Mandarin oranges (sunshine in every bite)
- Raspberries (the crowning glory!)
Here’s my secret: don’t just dump – gently place each fruit to maintain defined layers. And pat each type dry before adding to prevent juice bleed!
Step 3: Garnish and Serve
Pop that beauty in the fridge for at least 30 minutes – the chill makes all the flavors sing together. Right before serving, tuck fresh mint leaves around the top edge. The mint’s aroma makes the fruit taste even sweeter somehow! Pro tip: Bring it to room temp for about 5 minutes before serving if it’s been in the fridge overnight – the flavors will be brighter.
Tips for the Perfect Layered Fruit Salad
After making this more times than I can count, here are my hard-earned secrets for fruit salad perfection:
- Ripe but not mushy – Your fruit should yield slightly when pressed (except berries – those should be firm and plump)
- Patience with prep – Dry each fruit thoroughly with paper towels before layering to prevent a juice swamp at the bottom
- Layer logic – Heavier fruits like pineapple go on bottom, delicate berries on top to avoid crushing
- Make it yours – Swap fruits for allergies or preferences (my vegan friends love when I add pomegranate seeds for extra crunch)
Oh, and always assemble within 4 hours of serving – nobody likes brown, sad fruit!
Ingredient Substitutions & Variations
Look, I know we don’t always have every fruit on hand – that’s when this recipe gets really fun! Here are my favorite ways to mix it up:
- No pineapple? Mango cubes work beautifully – just slightly sweeter
- Berry allergies? Try pomegranate arils (those jewel-like seeds) for amazing crunch
- Not a kiwi fan? Sliced green grapes or honeydew melon balls keep that green pop
- Extra fancy? Add toasted coconut flakes between layers – game changer!
- Kid-friendly version? Swap in banana slices (but add them last-minute to prevent browning)
The rule? Keep the colors vibrant and the textures varied – that’s what makes each bite exciting!
Serving Suggestions for Layered Fruit Salad
Oh, the possibilities with this beauty! While it’s stunning all on its own (I mean, look at those colors!), here’s how I love to serve it up:
- Brunch superstar: Pair with vanilla yogurt for a breakfast-worthy treat
- BBQ sidekick: Let it shine next to grilled meats – the freshness cuts through rich flavors perfectly
- Dessert diva: Top with whipped cream or coconut cream for an extra indulgent touch
- Poolside perfection: Serve in individual mason jars for easy grab-and-go enjoyment
Honestly? I’ve even eaten it straight from the bowl with a big spoon at midnight – no judgment here!
Storage & Reheating Instructions
Listen, this salad is happiest when eaten fresh – those colors stay bright and textures stay crisp! But if you must store it, cover tightly with plastic wrap and refrigerate for no more than 24 hours. The berries will start to weep after that. And reheating? Oh honey, just don’t – cold and fresh is the whole point!
Layered Fruit Salad Nutrition Information
Okay, let’s be honest – when a dessert looks this good, you might forget it’s actually good for you too! Here’s the scoop on what’s in each serving (about 1 cup):
- 160 calories – Basically guilt-free compared to most desserts!
- 30g natural sugars – Straight from the fruit, no added sweeteners
- 5g fiber – Thanks to all those beautiful berry seeds and fruit skins
- 2g protein – Little bonus from the kiwi and citrus
Of course, these are estimates – your exact amounts will vary based on fruit sizes and ripeness. But isn’t it nice knowing something this delicious comes with vitamins instead of regrets?
Frequently Asked Questions
I get asked about this layered fruit salad all the time – here are the questions that pop up most often at my parties:
Can I use frozen fruit instead of fresh?
Oh honey, I wouldn’t recommend it for this recipe. Frozen fruit gets too mushy when thawed and will make your beautiful layers turn into a soggy mess. The texture just won’t be right. Stick with fresh – your taste buds will thank you!
How far in advance can I assemble this no bake dessert?
The sweet spot is 2-4 hours before serving. Any earlier and the juices start to run (especially from the berries). If you must prep ahead, layer everything except the raspberries and mint, then add those last-minute for perfect freshness.
What’s the best dish to use for a party fruit dessert like this?
A clear glass trifle bowl is my go-to – it shows off all those gorgeous layers! But any large glass serving bowl works. For smaller gatherings, individual mason jars make adorable single servings.
Can I add whipped cream or yogurt to this summer fruit salad?
Absolutely! I often serve whipped cream or vanilla yogurt on the side so guests can add their own. Just don’t mix it in ahead of time or the fruit will get watery. The contrast of cool cream with fresh fruit is heavenly!

Luscious 10-Cup Layered Fruit Salad That Steals the Show
- Total Time: 20 minutes
- Yield: 8 servings 1x
- Diet: Vegan
Description
A colorful and refreshing layered fruit salad perfect for parties or summer gatherings.
Ingredients
- 2 cups fresh pineapple, cubed
- 2 cups kiwi, peeled and diced
- 1 ½ cups red grapes, halved
- 1 ½ cups blackberries
- 1 ½ cups strawberries, chopped
- 1 ½ cups green grapes, halved
- 1 ½ cups blueberries
- 1 ½ cups mandarin orange segments
- 1 ½ cups raspberries
- Fresh mint leaves, for garnish
Instructions
- Place pineapple cubes evenly in the bottom of a clear trifle bowl or glass dish.
- Layer diced kiwi evenly over the pineapple.
- Add a layer of halved red grapes, followed by blackberries.
- Spoon chopped strawberries evenly on top.
- Add green grapes, then a layer of blueberries.
- Spoon mandarin orange segments over the blueberries.
- Finish with a generous top layer of raspberries.
- Garnish with fresh mint leaves before serving.
- Chill until ready to serve for best flavor.
Notes
- Use fresh, ripe fruit for the best taste.
- Adjust fruit quantities based on your preference.
- Serve chilled for maximum refreshment.
- Prep Time: 20 minutes
- Cook Time: 0 minutes
- Category: Dessert
- Method: No Bake
- Cuisine: International
Nutrition
- Serving Size: 1 serving
- Calories: 160
- Sugar: 30g
- Sodium: 5mg
- Fat: 1g
- Saturated Fat: 0g
- Unsaturated Fat: 0.5g
- Trans Fat: 0g
- Carbohydrates: 40g
- Fiber: 5g
- Protein: 2g
- Cholesterol: 0mg
Keywords: layered fruit salad, fruit trifle recipe, party fruit dessert, summer fruit salad, no bake dessert, fresh fruit platter