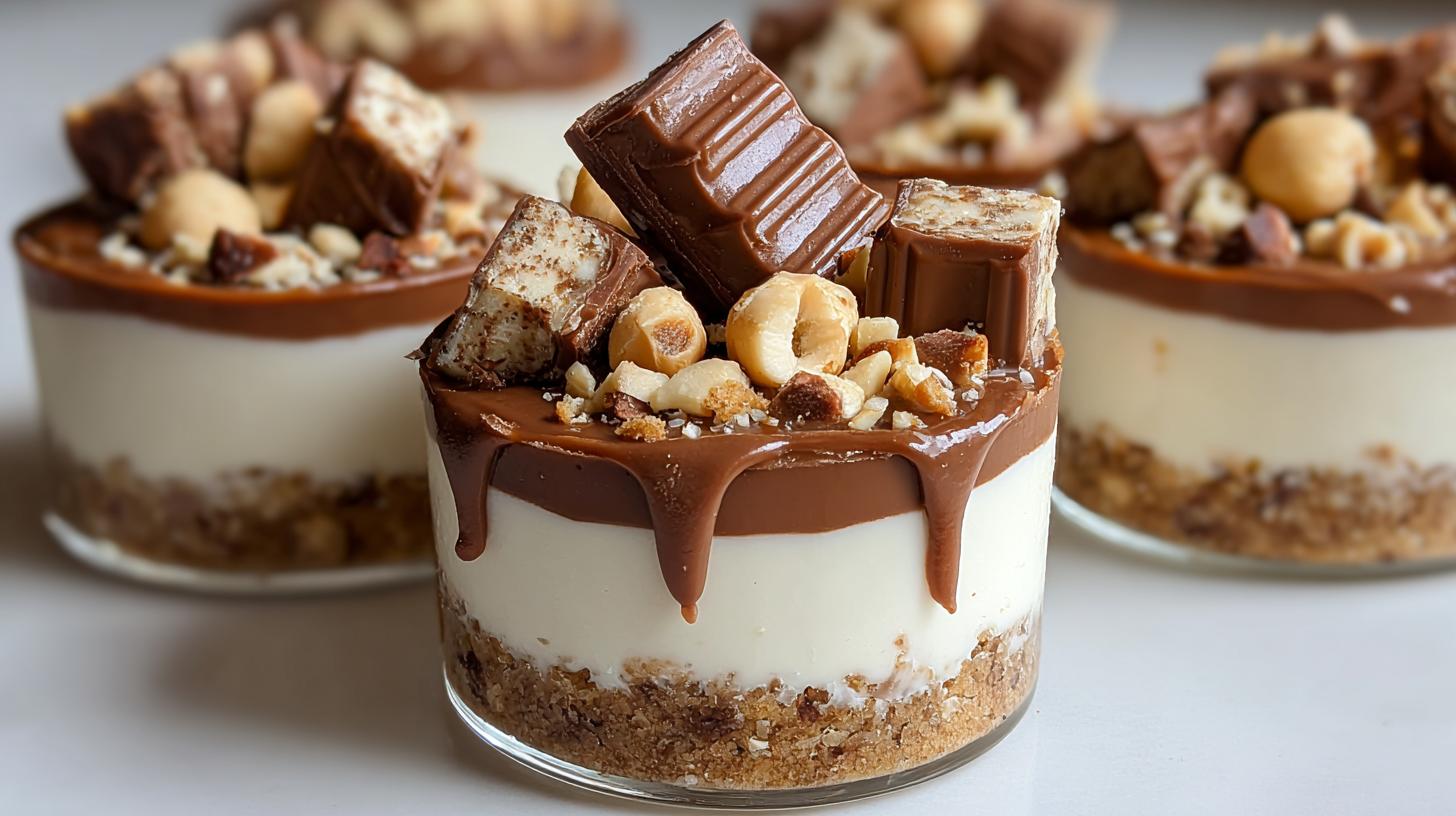
Oh my goodness, you have to try these Kinder Bueno cheesecake cups! I’ve been obsessed with no-bake desserts ever since my first disastrous attempt at baking a cheesecake (let’s just say the oven and I don’t always get along). These little cups are my go-to when I need something impressive but don’t want to turn on the oven – perfect for last-minute parties or when those chocolate cravings hit hard.
The magic happens when creamy cheesecake meets that irresistible Kinder Bueno crunch, all layered over a buttery biscuit base. I first made these for my niece’s birthday party, and let me tell you, the kids (and let’s be honest, the adults too) went wild for them. What I love most is how you can whip them up in about 20 minutes of active time, then let the fridge do the rest of the work while you put your feet up.
After testing dozens of no-bake recipes over the years, I can confidently say this combination of chocolate hazelnut spread and chopped Kinder Bueno bars creates the perfect balance of creamy and crunchy. They’re like little bites of heaven that look way fancier than the effort required – my kind of dessert!
Why You’ll Love These Kinder Bueno Cheesecake Cups
Trust me, once you try these little cups of joy, you’ll be hooked! Here’s why they’re my absolute favorite dessert to make (and eat):
- No oven needed – Perfect for hot summer days or when you just can’t be bothered to bake
- Ready in a flash – Just 20 minutes of hands-on time, then let the fridge work its magic
- Party perfection – Individual servings mean no messy slicing, and they look adorable on dessert tables
- That dreamy combo – Creamy cheesecake meets crunchy Kinder Bueno in every bite
- Easy to customize – Swap toppings or make them nut-free if needed
Seriously, these disappear faster than I can make them whenever I bring them to gatherings. The best part? Everyone thinks you spent hours in the kitchen!
Ingredients for Kinder Bueno Cheesecake Cups
Here’s everything you’ll need to make these irresistible dessert cups. I’ve learned through trial and error that using the right ingredients – and prepping them properly – makes all the difference between good and oh-my-goodness-this-is-amazing cheesecake cups!
- 1½ cups crushed digestive biscuits or graham crackers – About 12 biscuits crushed finely (I use a rolling pin between parchment paper – it’s oddly satisfying!)
- 6 tablespoons melted butter – Unsalted is best, but salted works if that’s what you have
- 12 oz cream cheese, softened – Take it out 30 minutes before using – this prevents lumpy filling
- ½ cup powdered sugar – Sift it if yours is clumpy
- 1 teaspoon vanilla extract – The good stuff makes a difference here
- 1 cup heavy whipping cream – Chill the bowl and beaters first for best results
- ¾ cup chocolate hazelnut spread – My secret? Warm it slightly to make swirling easier
- 4 Kinder Bueno bars, chopped – I like some bigger chunks for that signature crunch
- ¼ cup chopped hazelnuts or mixed nuts – Toast them lightly for extra flavor (optional but recommended)
Pro tip from my many kitchen experiments: measure everything out before starting. There’s nothing worse than realizing mid-recipe that your cream cheese is still rock hard! And don’t stress if you’re missing something – I’ve got substitution ideas coming up in the next section.
Equipment You’ll Need
Don’t worry – you won’t need any fancy gadgets for these cheesecake cups! Just grab these basic kitchen tools (chances are you already have most of them):
- Mixing bowls – One large, one medium (glass is great for seeing when your whipped cream’s ready)
- Electric mixer – A hand mixer works perfectly for this
- 8 small dessert cups – Glass or plastic, about 4-6 oz each
- Measuring cups and spoons – For all that precise pouring
- Spatula – My trusty silicone one never lets me down
That’s it! No special equipment needed – just everyday kitchen basics. Now let’s get mixing!
How to Make Kinder Bueno Cheesecake Cups
Alright, let’s get to the fun part – putting these dreamy dessert cups together! I promise it’s easier than it looks, and I’ll walk you through each step with all my hard-earned tips. Just follow along, and you’ll have restaurant-worthy treats in no time.
Preparing the Crust
First things first – that buttery biscuit base! Here’s how to get it just right:
- Mix your crushed digestive biscuits with melted butter until it looks like wet sand. You want every crumb coated – this is what holds everything together.
- Divide the mixture evenly between your dessert cups (about 2 tablespoons per cup). Now here’s my secret – use the back of a spoon or a small glass to press it down firmly. I mean really pack it in there! This prevents crumbling when you take that first glorious bite.
- Pop them in the fridge for 10 minutes to set. This quick chill gives the butter time to firm up so your crust stays put when you add the filling.
Making the Cheesecake Filling
This is where the magic happens – that creamy, dreamy cheesecake layer:
- Beat the softened cream cheese, powdered sugar, and vanilla together until completely smooth. No lumps allowed! Scrape down the sides of the bowl halfway through – those sneaky cream cheese lumps love to hide there.
- In a separate bowl, whip the heavy cream to stiff peaks. Pro tip: chill your bowl and beaters first – it makes whipping so much faster! The cream should hold its shape when you lift the beaters.
- Now, gently fold the whipped cream into the cream cheese mixture. I like to do this in three additions, using big, slow folding motions with a spatula. You want to keep all that air in the whipped cream – that’s what makes the filling light and fluffy!
Assembling the Dessert Cups
Time to bring it all together with those gorgeous layers:
- Spoon the cheesecake filling over your chilled crusts, smoothing the tops. I use a piping bag for neatness, but a spoon works just fine – no one will judge a few imperfect edges when they taste these!
- Warm your chocolate hazelnut spread slightly (10 seconds in the microwave does the trick) until it’s pourable but not hot. Drizzle it over the cheesecake layer – be as artistic or messy as you like!
- Sprinkle with chopped nuts and those glorious Kinder Bueno pieces. I like to press some chunks slightly into the filling so they don’t all fall off when eating.
- Chill for at least 2 hours (overnight is even better). I know it’s tempting to dig in right away, but trust me – the wait is worth it for that perfect set texture!
And that’s it! See? I told you it was easy. Now comes the hardest part – waiting for them to chill before you can enjoy your handiwork!
Tips for Perfect Kinder Bueno Cheesecake Cups
After making these cheesecake cups more times than I can count (purely for “quality control,” of course), I’ve picked up some foolproof tricks to guarantee perfect results every time:
- Room temp is key – Take that cream cheese out at least 30 minutes before starting. Cold cream cheese = lumpy filling, and nobody wants that!
- Whip it good – Beat the cream until it forms stiff peaks that hold their shape when you lift the beaters. Under-whipped cream makes the filling too soft.
- Chill out – I know it’s tempting, but don’t skip the full 2-hour chill time! This sets the layers perfectly so you get clean bites.
- Crumb control – Really press that biscuit base down hard with a glass or spoon – it prevents the dreaded “crumbly bottom” when eating.
Follow these simple tips, and you’ll be the dessert hero at every gathering!
Ingredient Substitutions & Variations
Don’t stress if you’re missing an ingredient or need to adapt these cheesecake cups – I’ve tried all sorts of swaps over the years! Here are my favorite ways to mix things up:
- Nut-free? Skip the hazelnuts and use crushed wafer cookies instead of Kinder Bueno (though the flavor won’t be quite the same).
- Biscuit alternatives – Oreo crumbs make a decadent chocolate crust, or try gluten-free graham crackers if needed.
- Dairy-free version – Use vegan cream cheese and coconut whipped cream (just know the texture will be slightly different).
- Topping ideas – Drizzle with caramel, fresh berries, or even crushed pretzels for that sweet-salty kick!
The beauty of this recipe is how adaptable it is – make it your own!
Serving and Storing Kinder Bueno Cheesecake Cups
Here’s the scoop on keeping these little beauties at their best! Always serve them chilled straight from the fridge – that cool, creamy texture is everything. If you’re feeling fancy, let them sit at room temperature for just 5 minutes before serving to soften slightly (but no longer or they’ll get too soft).
Got leftovers? (Unlikely, but just in case!) Cover them tightly and store in the fridge for up to 3 days. The crust might soften slightly by day 3, but they’ll still taste amazing. One word of warning – don’t freeze them. I learned this the hard way when my “brilliant” make-ahead plan turned the creamy filling grainy. Some kitchen experiments are best left untried!
Nutritional Information
Okay, let’s be real – we’re not eating Kinder Bueno cheesecake cups for their health benefits! But I know some folks like to keep track of these things, so here’s what you should know about the nutrition in these treats. Important note: All nutritional values are estimates and will vary based on the specific ingredients you use and how generous you are with those delicious toppings!
Each creamy, crunchy cup packs a good amount of energy (that’s the polite way to say “calories”), mostly from the cream cheese, chocolate spread, and those irresistible Kinder Bueno pieces. There’s some protein from the dairy and a bit of fiber from the biscuit base and nuts – but let’s be honest, we’re here for that heavenly chocolate-hazelnut combo!
If you’re watching certain nutrients, you can always adjust toppings or use reduced-fat cream cheese (though I prefer the full-fat version for that luxuriously creamy texture). Remember – everything in moderation, including moderation! These are meant to be an occasional indulgence that brings joy.
Frequently Asked Questions
I’ve gotten so many questions about these Kinder Bueno cheesecake cups over the years – here are the ones that pop up most often with my tried-and-true answers:
Can I use a different chocolate spread instead of Nutella?
Absolutely! Any chocolate hazelnut spread will work, or you can even use melted chocolate if you prefer. I’ve tried caramel spreads too – delicious, though the flavor profile changes completely. Just make sure whatever you use is spreadable when cool.
How long do these dessert cups last in the fridge?
They’re best eaten within 3 days, though let’s be honest – they rarely last that long in my house! The crust softens slightly over time, but the flavors actually deepen beautifully. Store them covered tightly with plastic wrap to prevent absorbing other fridge smells.
Can I make these mini cheesecake cups ahead for a party?
You’re reading my mind! These are perfect make-ahead party desserts. I often prepare them the night before – just wait to add the Kinder Bueno pieces until a few hours before serving so they stay crunchy. The cheesecake filling sets even better overnight!
What if I can’t find Kinder Bueno bars?
No worries! Crushed Ferrero Rocher or even chopped milk chocolate with some wafer bits make decent substitutes. The texture won’t be identical, but you’ll still get that chocolate-hazelnut magic. Or go wild and try crushed peanut butter cups!
Why did my whipped cream turn grainy?
Oh honey, I’ve been there! Usually this means either your cream wasn’t cold enough when whipping, or you overmixed it. Also, make sure your bowl and beaters are spotlessly clean – any grease can prevent proper whipping. If it happens, just start over with fresh cream.
Share Your Kinder Bueno Cheesecake Cups
I’d love to see how your kinder bueno cheesecake cups turn out! Snap a photo of your creations and tag me on social media – nothing makes me happier than seeing your kitchen triumphs. And don’t forget to rate the recipe below with those golden stars if they turned out as dreamy as mine always do!
Print
20-Minute Kinder Bueno Cheesecake Cups That Wow Everyone
- Total Time: 2 hours 20 minutes
- Yield: 8 dessert cups 1x
- Diet: Vegetarian
Description
Delicious no-bake Kinder Bueno cheesecake cups with a chocolate hazelnut twist, perfect for easy party desserts.
Ingredients
- 1½ cups crushed digestive biscuits or graham crackers
- 6 tablespoons melted butter
- 12 oz cream cheese, softened
- ½ cup powdered sugar
- 1 teaspoon vanilla extract
- 1 cup heavy whipping cream
- ¾ cup chocolate hazelnut spread (Nutella-style)
- 4 Kinder Bueno bars, chopped
- ¼ cup chopped hazelnuts or mixed nuts
Instructions
- Mix crushed biscuits with melted butter until fully combined.
- Press the mixture firmly into the bottoms of small dessert cups. Chill for 10 minutes.
- Beat cream cheese, powdered sugar, and vanilla until smooth.
- In a separate bowl, whip heavy cream to stiff peaks, then gently fold into the cream cheese mixture.
- Spoon the cheesecake layer evenly over the crusts and smooth the tops.
- Melt chocolate hazelnut spread slightly until pourable, then spoon over the cheesecake layer.
- Sprinkle with chopped nuts and top with Kinder Bueno pieces.
- Chill for at least 2 hours before serving.
Notes
- Use room temperature cream cheese for smoother mixing.
- For a nut-free version, omit the hazelnuts.
- Can be made a day ahead for easier serving.
- Prep Time: 20 minutes
- Cook Time: 0 minutes
- Category: Dessert
- Method: No Bake
- Cuisine: International
Nutrition
- Serving Size: 1 dessert cup
- Calories: 430
- Sugar: 32g
- Sodium: 220mg
- Fat: 32g
- Saturated Fat: 18g
- Unsaturated Fat: 11g
- Trans Fat: 0.5g
- Carbohydrates: 35g
- Fiber: 2g
- Protein: 6g
- Cholesterol: 75mg
Keywords: Kinder Bueno cheesecake cups, Chocolate hazelnut dessert, Dessert cups recipe, No bake cheesecake, Easy party desserts, Mini cheesecake cups