
Picture this: It’s the night before a big potluck, and I’m scrambling to make something impressive but easy. That’s when I first tried these turtle brownie cheesecake bites – and wow, did they save the day! These little guys pack all the rich, gooey goodness of classic turtle candies into perfect two-bite desserts. The best part? They look fancy but couldn’t be simpler to make. Just layer brownie batter and creamy cheesecake in muffin cups, then top with caramel, chocolate, and pecans. They’re always the first to disappear at parties – trust me, you’ll want to make extra!
Why You’ll Love These Turtle Brownie Cheesecake Bites
Let me tell you why these little bites became my go-to dessert for every occasion:
- Portable perfection: No plates needed! These mini cheesecakes are perfectly sized for grabbing and popping straight into your mouth (not that I’ve done that… okay, maybe once or twice).
- Flavor explosion: You get rich chocolate brownie, creamy cheesecake, gooey caramel, and crunchy pecans all in one bite – it’s like a party in your mouth!
- Make-ahead magic: They actually taste better after chilling overnight, which means less stress when you’re entertaining.
- Crowd pleaser: I’ve never met anyone who could resist them – even my “I don’t like sweets” uncle sneaks seconds!
Ingredients for Turtle Brownie Cheesecake Bites
Gathering your ingredients is half the fun with these bites – and trust me, every component matters! Here’s what you’ll need, grouped by layer so you can easily check your pantry:
For the brownie base:
- 1/2 cup unsalted butter, melted (the real stuff – no substitutes!)
- 1 cup granulated sugar
- 2 large eggs (room temperature works best)
- 1 tsp vanilla extract (splurge on the good kind)
- 1/3 cup unsweetened cocoa powder (I prefer Dutch-processed)
- 1/2 cup all-purpose flour
- 1/4 tsp salt
For the cheesecake layer:
- 16 oz cream cheese, softened (that’s 2 blocks – and yes, full-fat makes all the difference)
- 1/2 cup granulated sugar
- 1 large egg
- 1 tsp vanilla extract
- 1/4 cup sour cream (optional, but it makes the cheesecake extra creamy)
For the turtle toppings:
- 1/3 cup caramel sauce (homemade or store-bought – no judgment here)
- 1/3 cup chocolate sauce or melted chocolate
- 1/2 cup chopped pecans (toasted for extra flavor if you’re feeling fancy)
- 1/4 cup crushed cookies or brownie crumbs (optional, but adds great texture)
- 1 cup whipped topping or sweetened whipped cream for that perfect finishing swirl
Equipment You’ll Need
Don’t worry – you don’t need fancy gadgets for these turtle brownie cheesecake bites! Here’s what I always grab from my kitchen:
- Muffin pan: A standard 12-cup works perfectly
- Paper liners: The pretty ones make serving extra easy
- Mixing bowls: Two medium ones – one for brownie batter, one for cheesecake
- Hand mixer: Or stand mixer if you’ve got one – makes the cheesecake super smooth
- Silicone spatula: For scraping every last bit of batter (no waste!)
Bonus items if you’re feeling fancy: a piping bag for whipped cream swirls, and a small spoon for drizzling caramel like a pro!
How to Make Turtle Brownie Cheesecake Bites
Okay, let’s get baking! These turtle brownie cheesecake bites come together in four simple steps – I promise it’s easier than it looks. Just follow along and you’ll have perfect little desserts in no time!
Step 1: Prepare the Brownie Base
First things first – preheat that oven to 325°F and line your muffin pan with those cute paper liners. Now, grab your melted butter and sugar – whisk them together until they’re all cozy and combined. Add the eggs one at a time, then splash in that vanilla. Here’s my secret: mix the cocoa powder, flour, and salt separately first, then gently fold them into the wet ingredients. Don’t overmix! A few flour streaks are totally fine. Spoon about 1 1/2 tablespoons into each liner – just enough to cover the bottom. I use the back of a spoon to spread it evenly.
Step 2: Make the Cheesecake Layer
Now for the creamy magic! Beat that softened cream cheese until it’s smooth as silk – about 1 minute. Add the sugar and beat another minute until it’s fluffy. Here’s where patience pays off – scrape down the sides, then add the egg and vanilla, mixing just until combined. If you’re using sour cream, now’s the time! Spoon this heavenly mixture over your brownie bases, filling each cup about 3/4 full. Smooth the tops gently – they’ll even out as they bake.
Step 3: Bake and Cool
Pop them in the oven for 18-22 minutes. You’ll know they’re done when the edges are set but the centers still have a slight jiggle – like Jell-O! Let them cool in the pan for 10 minutes, then transfer to a wire rack. This slow cooling prevents cracks (though if they crack, we’ll cover them with toppings – shhh!). Once they’re room temp, refrigerate for at least 2 hours – overnight is even better!
Step 4: Add Toppings
The fun part! Pipe or dollop whipped cream on each bite. Drizzle caramel and chocolate sauces in zigzags – I sometimes warm the sauces slightly for easier drizzling. Sprinkle with those chopped pecans and cookie crumbs for crunch. Pro tip: do this right before serving to keep everything looking fresh and beautiful!
Tips for Perfect Turtle Brownie Cheesecake Bites
After making these dozens of times (okay, maybe hundreds – don’t judge!), I’ve picked up some foolproof tricks:
- Room temp is key: Cold cream cheese lumps are the enemy! Let yours soften on the counter for at least 30 minutes before mixing.
- Gentle hands: Overmixing the brownie batter makes tough bites. Fold just until combined – a few flour streaks are fine!
- Chill out: I know it’s hard to wait, but that 2-hour chill makes all the difference for clean slices and perfect texture.
- Pecan power: Toast your pecans for 5 minutes at 350°F first – it brings out their nutty magic!
- Storage smarts: Keep toppings separate until serving if making ahead – nobody likes soggy pecans!
Variations and Substitutions
One of the best things about these turtle brownie cheesecake bites is how easily you can tweak them to suit any taste or diet! Here are my favorite swaps:
- Gluten-free: Use your favorite 1:1 gluten-free flour blend instead of all-purpose – I promise no one will notice!
- Nut-free: Skip the pecans and use crushed pretzels or toffee bits for that perfect crunch.
- Extra chocolatey: Swap the caramel for dark chocolate sauce – because sometimes more chocolate is the answer.
- Dairy-free: Try plant-based cream cheese and coconut oil instead of butter (though the texture changes slightly).
See? Endless possibilities for your perfect bite!
Serving and Storage
These turtle brownie cheesecake bites taste best straight from the fridge – that chill makes the cheesecake layer extra dreamy! Keep them in an airtight container with layers separated by parchment paper (those toppings can get sticky). They’ll stay perfect for up to 3 days… if they last that long! For longer storage, freeze them without toppings for up to a month – just thaw overnight in the fridge and add fresh toppings before serving.
Nutritional Information
Here’s the scoop on nutrition per mini bite (but remember – these are estimates and can vary based on your specific ingredients): About 360 calories, 22g fat, and 35g carbs per serving. Not exactly health food, but totally worth every delicious bite!
Frequently Asked Questions
I get asked about these turtle brownie cheesecake bites all the time – here are the top questions that pop up from fellow bakers:
Can I use boxed brownie mix instead of making it from scratch?
Absolutely! For even quicker brownie cheesecake cups, use your favorite box mix (prepare as directed for “fudgy” style). Just use about 1 tablespoon of batter per liner instead of 1 1/2. The texture changes slightly, but they’re still delicious!
Why did my mini turtle cheesecakes sink in the middle?
Don’t panic! This usually happens from overmixing the cheesecake layer (too much air gets whipped in) or opening the oven door too early. Next time, mix just until combined and resist peeking until at least 15 minutes in. The slight jiggle test is your friend!
Can I freeze these cheesecake brownie cupcakes?
You bet! Freeze them before adding toppings – they’ll keep beautifully for a month. Thaw overnight in the fridge, then add fresh whipped cream and sauces. Perfect for make-ahead dessert emergencies!
What’s the best way to prevent cracking?
Slow and steady wins the race! Letting them cool gradually in the turned-off oven with the door cracked helps. But honestly? We’re covering them with toppings, so don’t stress – my first batch looked like the Grand Canyon and still disappeared instantly!
Can I make these nut-free for allergies?
Of course! Skip the pecans and use crushed pretzels, toffee bits, or even coconut flakes. The chocolate caramel pecan dessert becomes whatever you want it to be!
Share Your Creation
I’d love to see your turtle brownie cheesecake bites! Tag me on Instagram @mykitchenadventures or leave a review below – your photos might just inspire my next batch!
Print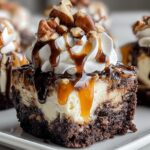
Irresistible 2-Bite Turtle Brownie Cheesecake Bites Recipe
- Total Time: 2 hours 42 minutes
- Yield: 12 mini bites 1x
- Diet: Vegetarian
Description
Delicious mini turtle brownie cheesecake bites with layers of brownie, creamy cheesecake, and topped with caramel, chocolate, and pecans.
Ingredients
- 1/2 cup unsalted butter, melted
- 1 cup granulated sugar
- 2 large eggs
- 1 tsp vanilla extract
- 1/3 cup unsweetened cocoa powder
- 1/2 cup all-purpose flour
- 1/4 tsp salt
- 16 oz cream cheese, softened (2 blocks)
- 1/2 cup granulated sugar
- 1 large egg
- 1 tsp vanilla extract
- 1/4 cup sour cream (optional for extra creaminess)
- 1 cup whipped topping or sweetened whipped cream
- 1/3 cup caramel sauce
- 1/3 cup chocolate sauce (or melted chocolate)
- 1/2 cup chopped pecans
- 1/4 cup crushed cookies or brownie crumbs (optional, for extra crunch)
Instructions
- Preheat oven to 325°F. Line a 12-cup muffin pan with paper liners.
- Whisk melted butter and sugar. Add eggs and vanilla. Stir in cocoa powder, flour, and salt just until combined.
- Spoon about 1 1/2 tbsp brownie batter into each liner and spread slightly.
- Beat cream cheese and sugar until smooth. Mix in egg, vanilla, and sour cream (if using) until creamy.
- Spoon cheesecake mixture over brownie layer, filling each cup about 3/4 full.
- Bake 18–22 minutes, until centers are just set (slight jiggle is okay).
- Cool to room temp, then refrigerate at least 2 hours (or overnight) until fully chilled.
- Top each bite with a swirl of whipped topping, then drizzle with caramel and chocolate. Sprinkle with chopped pecans and cookie/brownie crumbs.
Notes
- Use room temperature cream cheese for smoother blending.
- Chilling the bites before serving helps them set properly.
- Store leftovers in the refrigerator for up to 3 days.
- Prep Time: 20 minutes
- Cook Time: 22 minutes
- Category: Dessert
- Method: Baking
- Cuisine: American
Nutrition
- Serving Size: 1 mini bite
- Calories: 360
- Sugar: 25g
- Sodium: 150mg
- Fat: 22g
- Saturated Fat: 12g
- Unsaturated Fat: 8g
- Trans Fat: 0g
- Carbohydrates: 35g
- Fiber: 2g
- Protein: 5g
- Cholesterol: 80mg
Keywords: turtle brownie cheesecake bites, brownie cheesecake cups, chocolate caramel pecan dessert, mini turtle cheesecakes, cheesecake brownie cupcakes, easy make ahead dessert