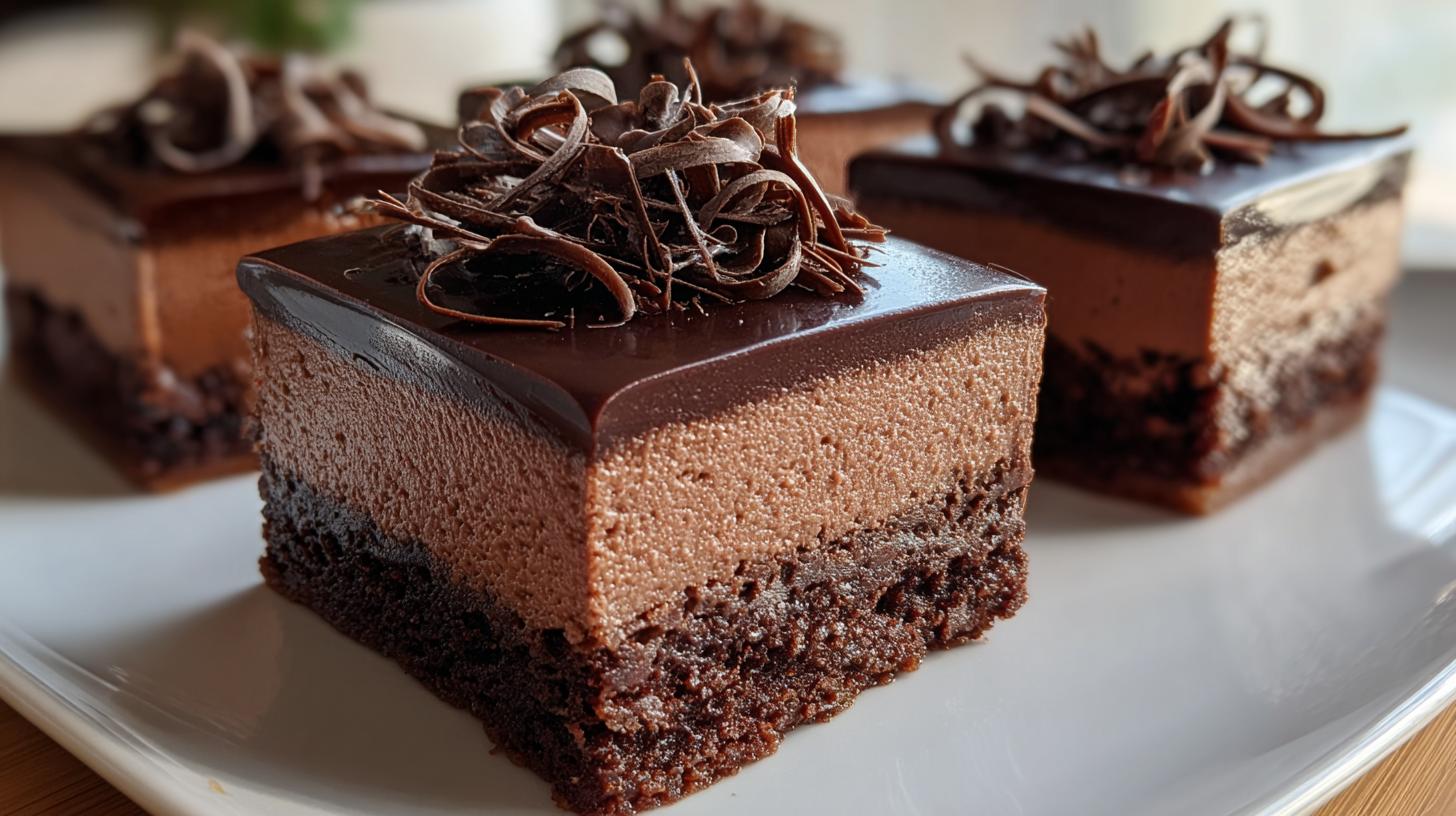
Oh my goodness, you’re in for a treat! These chocolate mousse brownies are my ultimate weakness – a decadent triple-layer dessert that combines everything I love about chocolate. Imagine biting through that glossy ganache into fluffy chocolate mousse, all resting on a fudgy brownie base. It’s like three desserts in one!
I first made these for a dinner party years ago when I wanted something fancier than regular brownies but easier than a full cake. The compliments came pouring in faster than the ganache! What makes them special is how each layer plays off the others – the dense brownie, airy mousse, and silky chocolate topping create this perfect harmony of textures. Trust me, these disappear fast whenever I bring them anywhere.
The best part? They’re secretly easy to make with just a few simple ingredients. Whether you’re treating yourself or impressing guests, these chocolate mousse brownies always feel like a special occasion.
Why You’ll Love These Chocolate Mousse Brownies
Let me count the ways these beauties will steal your heart (and probably your waistline)! First off, they’re the ultimate chocolate lover’s dream – rich, fudgy, and creamy all in one bite. But here’s what really makes them stand out:
- Make-ahead magic: These actually get better after chilling overnight, making them perfect for stress-free entertaining
- Restaurant-worthy presentation: That glossy ganache topping looks like it came from a fancy bakery
- Texture heaven: The contrast between the dense brownie base and cloud-like mousse is just *chef’s kiss*
- Secretly simple: Using a boxed brownie mix means you’re halfway done before you’ve even broken a sweat
Seriously, these brownies have saved me at countless potlucks when I needed something quick but impressive. The compliments? They’re practically guaranteed!
Ingredients for Chocolate Mousse Brownies
Gather these simple ingredients – I bet you have most in your pantry already! The magic happens when these humble components come together. Here’s what you’ll need:
- 1 box brownie mix (plus whatever eggs/oil it calls for – I always use the fudgy variety)
- 1½ cups heavy whipping cream, chilled (trust me, cold cream whips up fluffier)
- 1 cup semi-sweet chocolate chips (divided – we’ll use ¾ cup later for ganache)
- 2 tbsp powdered sugar (don’t skip this – it stabilizes the mousse)
- 1 tsp vanilla extract (the good stuff makes all the difference)
- ½ cup heavy cream (for that luxurious ganache topping)
- Chocolate curls or shavings (optional, but so pretty for garnish)
Pro tip: If you’re feeling fancy, swap the semi-sweet chips for dark chocolate – I sometimes do half and half for a more complex flavor. And whatever you do, don’t use chocolate chips with wax coatings – they won’t melt properly for the mousse!
Equipment You’ll Need
You won’t need anything fancy for these chocolate mousse brownies – just the basics from your kitchen! Here’s what I always grab:
- 9×9-inch baking pan (my trusty square pan gets used for everything!)
- Electric mixer (hand or stand – either works for whipping that dreamy mousse)
- Heatproof bowls (one for melting chocolate, another for ganache)
- Spatula (for folding that mousse just right)
- Measuring cups/spoons (baking is all about precision)
That’s it! See? I told you this was easy. Now let’s get to the fun part – making some magic!
How to Make Chocolate Mousse Brownies
Okay, let’s dive into the magic! Follow these steps carefully, and you’ll have the most decadent chocolate mousse brownies that’ll make you feel like a pastry chef. Don’t worry – it’s easier than it looks!
Preparing the Brownie Base
First things first – that fudgy foundation! I always use my favorite boxed brownie mix (the kind that promises “extra fudgy” on the box) because it’s foolproof. Prepare it exactly as the package directs, baking it in your 9×9-inch pan. Here’s my secret – underbake it just slightly (about 2 minutes less than the minimum time) for maximum fudginess.
Now, the hardest part – WAIT. I know it’s tempting, but you must let those brownies cool completely before adding the mousse. If they’re even slightly warm, the mousse will melt into a sad puddle. I usually bake them in the morning and assemble in the afternoon. Patience pays off, I promise!
Making the Chocolate Mousse Layer
This is where the magic happens! Melt 1 cup of chocolate chips (I do it in 30-second bursts in the microwave, stirring between each) and let it cool slightly – you don’t want it hot enough to deflate the cream.
While that’s cooling, whip the chilled heavy cream with powdered sugar and vanilla until soft peaks form. Now comes the fun part – gently fold the melted chocolate into the whipped cream. I use a spatula and make big, slow “J” motions, working my way around the bowl. Stop as soon as no white streaks remain – overmixing deflates all that air we worked so hard to incorporate!
Spread this cloud of chocolatey goodness evenly over your cooled brownies. Pop it in the fridge for at least an hour to set. This is a great stopping point if you’re making them ahead!
Adding the Ganache Topping
Almost there! For that professional-looking glossy finish, heat ½ cup cream until steaming (but not boiling), then pour over ¾ cup chocolate chips in a heatproof bowl. Let it sit untouched for 2 minutes – this is crucial for smooth melting. Then gently stir until silky. I like to let it cool slightly (about 5 minutes) so it’s thick but still pourable.
Slowly pour the ganache over the chilled mousse layer, tilting the pan to help it spread evenly. The contrast of textures is everything here! Back in the fridge it goes for at least 2 hours (overnight is better) before slicing. When you’re ready to serve, run a knife under hot water and dry it for clean cuts through all those gorgeous layers.
Tips for Perfect Chocolate Mousse Brownies
After making these more times than I can count, I’ve learned a few tricks for fail-proof chocolate mousse brownies every single time:
- Chill everything cold: Your mixing bowl, beaters, and cream should all be cold for the fluffiest mousse. I sometimes pop them in the freezer for 10 minutes before starting.
- Slice cleanly: For picture-perfect squares, dip your knife in hot water and wipe it clean between each cut. The heat glides right through that ganache!
- Patience is key: Rushing the chilling steps leads to messy layers. Give each one the full time it needs to set properly.
- Room temp chocolate: Let melted chocolate cool just slightly before folding into cream – too hot and it’ll deflate, too cold and it’ll clump.
Follow these simple tips, and you’ll have brownies that look and taste like they came from a fancy patisserie!
Variations for Chocolate Mousse Brownies
Oh, the possibilities! While I adore the classic version, sometimes I like to play around with these chocolate mousse brownies. Here are my favorite twists:
- Coffee kick: Add 1 tsp instant espresso powder to the brownie batter – it makes the chocolate taste even richer!
- Minty fresh: Swap vanilla extract for peppermint in the mousse layer – perfect for holiday gatherings.
- Berry bliss: Top chilled ganache with fresh raspberries for a gorgeous tart contrast.
- Nutty delight: Sprinkle chopped toasted hazelnuts between the mousse and ganache layers.
The best part? You can mix and match these ideas to create your own signature version. Just don’t tell my grandma I’m messing with perfection!
Serving and Storing Chocolate Mousse Brownies
Here’s the fun part – showing off your masterpiece! These brownies slice best when chilled, so I always take them straight from fridge to cutting board. My trick? Run your knife under hot water and dry it completely before each cut – you’ll get those gorgeous clean layers in every slice. For storage, just pop them in an airtight container in the fridge. They’ll stay perfect for up to 3 days (if they last that long!). The mousse actually gets even more flavorful by day two – if you can wait that long!
Nutritional Information
Okay, let’s be real – we’re not eating chocolate mousse brownies for their health benefits! But since you asked, here’s the scoop (based on my favorite brand of brownie mix and standard ingredients): each indulgent square packs about 520 calories with that dreamy combo of 32g fat and 42g sugar. These numbers are estimates though – your exact count might vary depending on the brands you use. Pro tip: Smaller slices mean you can justify seconds… not that I’m speaking from experience or anything!
Frequently Asked Questions
Can I use homemade brownies instead of a mix?
Absolutely! My go-to homemade recipe works beautifully – just bake it in the same 9×9 pan until a toothpick comes out with moist crumbs (not wet batter). Let it cool completely before adding the mousse layer. The boxed mix is just my shortcut when I’m in a hurry.
How long do these chocolate mousse brownies keep?
They’re at their best within 3 days stored in the fridge, but honestly? They never last that long in my house! The mousse stays dreamy, and the brownie base actually gets more fudgy as it sits. Just keep them tightly covered so they don’t absorb fridge odors.
Can I freeze these brownies?
Technically yes, but the texture changes a bit. The mousse can get slightly grainy after thawing. If you must freeze, do it before adding the ganache, then add that fresh after thawing. They’ll still taste amazing, just not quite as perfect as fresh.
Why did my mousse layer deflate?
Two likely culprits: overmixing after adding the chocolate (be gentle with that spatula!) or the chocolate was too hot when folded in. Next time, let the melted chocolate cool until just warm to the touch before incorporating.
Decadent Chocolate Mousse Brownies with 3 Dreamy Layers
- Total Time: 3 hours 20 minutes
- Yield: 9 servings 1x
- Diet: Vegetarian
Description
Rich chocolate mousse brownies with a fudgy base, creamy mousse layer, and glossy ganache topping.
Ingredients
- 1 box brownie mix (plus ingredients listed on box)
- 1½ cups heavy whipping cream
- 1 cup semi-sweet chocolate chips
- 2 tbsp powdered sugar
- 1 tsp vanilla extract
- ¾ cup semi-sweet chocolate chips
- ½ cup heavy cream
- Chocolate curls or shavings (optional)
Instructions
- Prepare brownies according to package instructions in a 9×9-inch baking dish. Bake and allow to cool completely.
- Melt 1 cup chocolate chips and let cool slightly.
- In a large bowl, whip heavy cream with powdered sugar and vanilla until soft peaks form.
- Gently fold melted chocolate into the whipped cream until smooth and fluffy.
- Spread chocolate mousse evenly over cooled brownies. Chill for 1 hour.
- Heat ½ cup heavy cream until just steaming, then pour over ¾ cup chocolate chips. Let sit 2 minutes, then stir until smooth.
- Pour ganache over mousse layer and spread evenly.
- Chill for at least 2 hours or until fully set.
- Garnish with chocolate curls, slice into squares, and serve chilled.
Notes
- Use high-quality chocolate for best results.
- Ensure brownies are fully cooled before adding mousse.
- Chill between layers for clean cuts.
- Prep Time: 20 minutes
- Cook Time: As per brownie mix instructions
- Category: Dessert
- Method: Baking, Chilling
- Cuisine: American
Nutrition
- Serving Size: 1 square
- Calories: 520
- Sugar: 42g
- Sodium: 180mg
- Fat: 32g
- Saturated Fat: 18g
- Unsaturated Fat: 10g
- Trans Fat: 0g
- Carbohydrates: 55g
- Fiber: 3g
- Protein: 6g
- Cholesterol: 65mg
Keywords: chocolate mousse brownies, chocolate brownie mousse, rich chocolate brownies, chocolate lovers dessert, fudgy brownie recipe, make ahead dessert