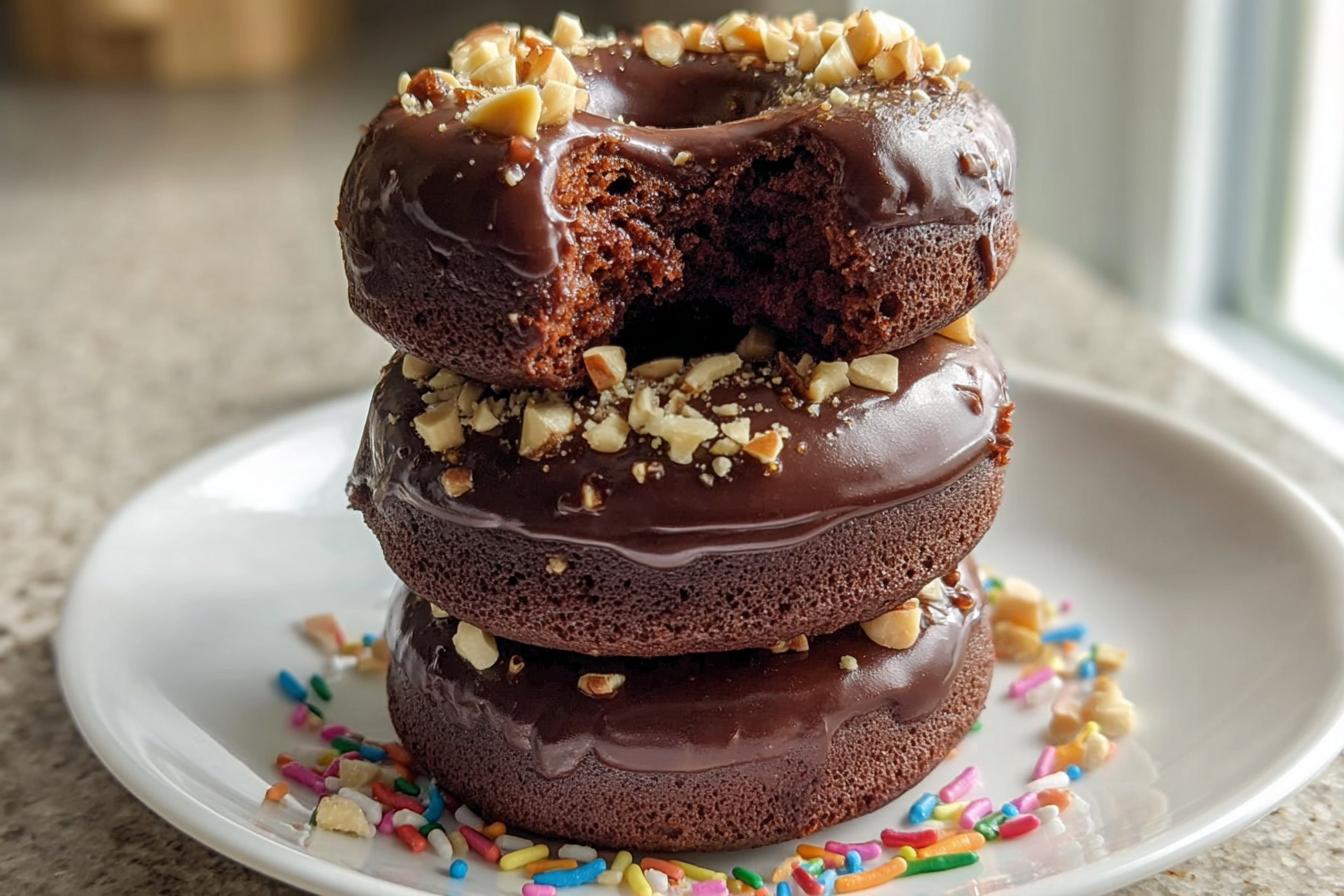
Oh my gosh, you have to try these baked chocolate donuts! They’re my go-to when I need a chocolate fix but don’t want to deal with frying oil splatters all over my kitchen. I swear, the first time I made these, my kids thought I’d bought them from some fancy bakery – that’s how good they look!
What I love most is how simple they are. Just mix, bake, dip, and boom – you’ve got these gorgeous little chocolate rings ready to devour. The glaze? Pure magic. It’s that perfect shiny coat that makes them look professional, but trust me, it’s easier than tying your shoes. My neighbor Karen begged for the recipe after I brought a batch to our book club last month.
These donuts have saved me so many times – last-minute school treats, surprise guests, those “I just need chocolate NOW” moments. And the best part? Your house smells like a chocolate shop for hours afterward. You’re going to flip when you see how easy they come together!
Ingredients for Baked Chocolate Donuts
Okay, let’s talk ingredients – and I promise you probably have most of this in your pantry right now! The magic of these donuts comes from simple stuff, but there are a few little tricks I’ve learned over dozens of batches that make all the difference.
The Dry Team
- 1 cup all-purpose flour – spoon it in lightly, don’t pack it!
- 1/3 cup unsweetened cocoa powder – sift this if yours is lumpy (I never used to bother until I saw how much fluffier it makes the donuts)
- 1/2 cup granulated sugar – just regular white sugar works great
- 1 teaspoon baking powder – make sure yours is fresh!
- 1/2 teaspoon baking soda – the secret lift-maker
- 1/4 teaspoon salt – trust me, it balances the sweetness perfectly
The Wet Team
- 1/2 cup milk – whole milk makes them extra rich, but any kind works
- 1/4 cup sour cream or plain Greek yogurt – this is my secret weapon for super moist donuts (I usually use yogurt because I always have it)
- 1 large egg – room temp blends better
- 2 tablespoons unsalted butter, melted – let it cool slightly before adding
- 1 teaspoon vanilla extract – the good stuff if you’ve got it
For That Gorgeous Glaze
- 1 cup powdered sugar – sift it unless you want lumpy glaze (learned that the hard way!)
- 2 tablespoons unsweetened cocoa powder – gives that deep chocolate color
- 2 tablespoons milk, plus more as needed – add slowly until it’s pourable but still thick
- 1/2 teaspoon vanilla extract – just a hint to round out the flavor
- 1 tablespoon melted butter – makes the glaze shiny and helps it set
- Chopped nuts or rainbow sprinkles – totally optional but so fun for kids (or let’s be honest, adults too)
See? Nothing crazy here – just good, simple ingredients that come together to make something magical. Now let’s get mixing!
How to Make Baked Chocolate Donuts
Alright, here’s where the magic happens! Don’t let the multiple steps fool you – this whole process is actually super straightforward. I’ve made these so many times I could probably do it in my sleep, but I’ll walk you through every little detail so yours turn out perfect on the first try.
Preparing the Batter
First things first – preheat that oven to 350°F and give your donut pan a good spray with nonstick spray. I always do this first because I can’t tell you how many times I’ve mixed the batter and then realized my oven’s cold!
Now, grab two bowls – one for dry ingredients, one for wet. Whisk together all your dry stuff (flour, cocoa powder, sugar, baking powder, baking soda, and salt) until it’s nice and uniform. No cocoa lumps allowed!
In the other bowl, whisk your wet ingredients – milk, sour cream or yogurt, egg, melted butter, and vanilla. Make sure everything is well combined and smooth.
Here’s the most important part: pour the wet into the dry and stir until just combined. I mean it – stop when you don’t see dry flour anymore! Overmixing is the enemy of tender donuts. The batter will be thick but still pourable – kind of like brownie batter consistency.
Now, spoon this gorgeous chocolate batter into your prepared pan. I like to use a piping bag or even just a ziplock bag with the corner snipped off – it’s so much cleaner than trying to spoon it in! Fill each cavity about 3/4 full so they have room to rise into perfect little rings.
Baking the Donuts
Pop that pan right in the center of your preheated oven. Middle rack is best for even baking – no burnt bottoms or pale tops!
Set your timer for 10 minutes, but start checking at around 8 minutes. Ovens can be tricky, and mine sometimes runs hot. You’ll know they’re done when the tops spring back lightly when you touch them. A toothpick inserted should come out with just a few moist crumbs – not wet batter.
Don’t overbake them! They’ll continue cooking a bit in the pan after you take them out. Let them cool in the pan for exactly 5 minutes – this helps them set up so they don’t break when you remove them. Then gently transfer them to a wire rack to cool completely before glazing. I know it’s hard to wait, but warm donuts make runny glaze!
Making the Chocolate Glaze
While the donuts are cooling, let’s make that gorgeous glaze! Sift your powdered sugar and cocoa powder into a medium bowl – this prevents those annoying little lumps that ruin the smooth finish.
Add your milk, vanilla, and melted butter and whisk until it’s completely smooth. You want it to be thick but still pourable – like a thick chocolate syrup. If it’s too thick, add milk a teaspoon at a time. Too thin? Add a bit more powdered sugar.
Now for the fun part – dipping! Once your donuts are completely cool, hold one by the bottom and dip the top straight down into the glaze. Give it a little twist as you lift it up to let the excess drip off. Place it back on the wire rack glaze-side up.
If you’re adding sprinkles or nuts, do it immediately after dipping while the glaze is still wet. They’ll stick perfectly! Then just let the glaze set for about 15-20 minutes before serving. The wait is torture, but so worth it!
Why You’ll Love These Baked Chocolate Donuts
Listen, I know everyone claims their recipe is the best, but these baked chocolate donuts? They’ve got some serious magic going on. Here’s why they’ve become my absolute weakness (and probably will be yours too):
- Easier than running to the bakery – Seriously, from mixing bowl to your mouth in under 30 minutes. No deep fryer, no mess, no fancy equipment needed. Just your basic kitchen stuff and a donut pan (which, trust me, is worth every penny).
- Healthier than fried versions – Okay, they’re still dessert, but baking means way less oil soaking into these babies. My yoga instructor friend actually approved of these as her “cheat day” treat – that’s how you know they’re good!
- That rich chocolate flavor – The combo of cocoa powder in the batter AND the glaze gives you double the chocolate punch. It’s like biting into a fudgy brownie, but in adorable ring form. My kids call them “grown-up donuts” because they’re not sickly sweet.
- Glaze that makes you look like a pro – That shiny chocolate coating? Foolproof. Unlike frosting that needs perfect piping skills, you just dip and go. Plus, it sets beautifully so you can stack them for parties without smudges.
- Endless ways to customize – Swap the glaze for vanilla or peanut butter, toss on some sea salt flakes, or go wild with sprinkles. I’ve even crushed up candy canes for Christmas versions. They’re like your favorite little black dress – dress ’em up or down!
- Smell that lingers – Your kitchen will smell like a chocolate shop for hours. Warning: may cause neighbors to suddenly “drop by” unannounced. Not that I’m complaining – more taste-testers!
Honestly? The hardest part about these donuts is not eating the whole batch in one sitting. But hey, I won’t judge if you do – I’ve been there!
Tips for Perfect Baked Chocolate Donuts
Okay, let me share all my hard-earned secrets for donut perfection! I’ve made every mistake possible so you don’t have to. These little tips will take your baked chocolate donuts from good to “Oh my god, did you really make these?”
Batter Too Thick? Too Thin?
If your batter looks more like cookie dough than pourable batter, don’t panic! Just add milk a tablespoon at a time until it reaches that sweet spot – thick but still spoonable. On the flip side, if it’s runny like pancake batter, sprinkle in a bit more flour (like a tablespoon) until it thickens up. The perfect consistency should slowly drop off your spoon in ribbons.
Glaze Troubleshooting
Glaze too thin? Been there! Whisk in more powdered sugar a tablespoon at a time until it coats the back of a spoon thickly. Too thick? Add milk drop by drop – I mean it, go slow! You want it to flow slowly off a spoon but still cling to the donuts. Pro tip: if your glaze starts setting up while you’re working, just pop the bowl in the microwave for 5-10 seconds to loosen it back up.
Storage Like a Pro
These donuts are best eaten the day you make them (no problem in my house!), but if you must save some:
- Room temp: Store unglazed donuts in an airtight container for up to 2 days. Glazed ones get sticky after a day.
- Freezing: Freeze unglazed donuts in a single layer, then transfer to a bag for up to 3 months. Thaw at room temp and glaze fresh!
- Reviving: Stale donuts? 10 seconds in the microwave makes them taste fresh-baked again.
Donut Pan Wisdom
That first batch sticking? Ugh, the worst! Always spray your pan WELL, getting into all the nooks. If you’re a frequent donut baker, invest in a nonstick pan – mine was worth every penny. No pan? No problem! Spoon the batter into greased muffin tins filling only halfway – you’ll get cute little donut “holes” instead.
The Secret to Shiny Glaze
Want that bakery-perfect glossy finish? Add a tiny pinch of corn syrup (about 1/4 teaspoon) to your glaze – it gives that professional sheen. Also, make sure your donuts are completely cool before dipping. Warm donuts = melty glaze mess!
Remember – even “imperfect” donuts taste amazing. My first batch looked like lumpy chocolate bagels, but disappeared just as fast as the pretty ones!
Variations for Baked Chocolate Donuts
Okay, here’s where we get to play! The basic recipe is absolutely perfect, but sometimes you just want to mix things up. I’ve tried so many twists on these donuts, and honestly, they’re all delicious. Don’t be afraid to get creative – it’s hard to mess these up!
Flour Power Swaps
Need these to be gluten-free? You totally can! I’ve had great success using a 1:1 gluten-free all-purpose flour blend. Just make sure it has xanthan gum in it already – that helps with the texture. My friend who’s celiac said these were the best GF donuts she’s ever had!
Want to make them a bit heartier? You can swap out half the all-purpose flour for whole wheat pastry flour. It gives them a nice, nutty depth that works surprisingly well with the chocolate. Just don’t go full whole wheat – it can make them a bit too dense.
Dairy-Free Delights
No dairy? No problem! I’ve made these for my vegan sister-in-law more times than I can count. For the milk, any unsweetened plant-based milk works – almond, oat, and soy are my top picks. Instead of the sour cream/yogurt, I use an equal amount of dairy-free yogurt or even applesauce! And for the butter? Coconut oil or vegan butter works like a charm. The glaze might need a tiny bit more liquid, but it sets up just fine.
Topping Extravaganza
Oh, the toppings! This is my favorite part. The classic chocolate glaze is a dream, but why stop there?
- Crushed Nuts: Toasted pecans or almonds are my go-to. Just chop them finely and press them into the wet glaze. It adds such a nice crunch!
- Coconut: Toasted coconut flakes? Yes, please! It gives a tropical vibe that’s so fun. My kids love the colored “snowball” coconut around the holidays.
- Sea Salt Flakes: A little sprinkle of flaky sea salt on top of the chocolate glaze is *chef’s kiss*. It cuts the sweetness and makes them feel super fancy.
- Peanut Butter Glaze: Sometimes I swap the chocolate glaze for a simple mix of powdered sugar, milk, and a big spoonful of peanut butter. It’s like a Reese’s in donut form!
- Crushed Candy: Leftover candy canes, crushed Oreos, or even chopped-up peanut butter cups? Amazing. Just press them on right after dipping.
The best part about these variations is that the base donut is so forgiving. It’s like a blank chocolate canvas waiting for your masterpiece. Go wild and tell me what crazy combo you come up with!
Serving Suggestions
Okay, let’s talk about the best ways to serve these beauties! Sure, you could just grab one straight off the cooling rack (I won’t tell), but sometimes you want to make them feel extra special. Here are my favorite ways to serve these baked chocolate donuts that’ll have everyone thinking you’re a pastry chef!
The Classic Coffee Date
Nothing beats a fresh chocolate donut with a steaming cup of coffee – it’s a match made in heaven! I love arranging them on a vintage cake stand with some pretty napkins for weekend brunch. The glaze catches the morning light so beautifully. Pro tip: dunking is totally allowed here – that chocolate glaze melting slightly into your coffee? Absolute perfection.
Milk & Donuts for the Kids
My kids go nuts when I serve these with ice-cold milk in little mason jars. I’ll sometimes stick a donut on a popsicle stick (we call them “donut pops”) for less mess. Rainbow sprinkles are mandatory for this setup – the more colorful, the better! It’s become our Saturday morning tradition after soccer games.
Dessert Platter Magic
For parties, I arrange them on a wooden board with other bite-sized treats – mini cupcakes, fresh berries, and maybe some chocolate-dipped pretzels. The contrast looks so fancy! Stack them in alternating directions and dust lightly with powdered sugar right before serving. Last Christmas, I tied little red ribbons around each donut – took 2 minutes but looked straight out of a magazine!
Special Occasion Upgrade
Birthdays or anniversaries? Pipe some whipped cream rosettes on top and add fresh raspberries. I’ve even drizzled melted white chocolate in zigzags over the glaze for extra pizzazz. Serve with dessert forks for maximum elegance (though let’s be real – fingers still work best).
Honestly? These donuts shine no matter how you serve them. I’ve eaten them standing over the kitchen sink at midnight (don’t judge), and they were just as delicious as when I plated them fancy for book club. The important thing is sharing them with people you love – even if that person is just you in your pajamas!
Nutritional Information
Okay, let’s be real – we’re not eating chocolate donuts for their health benefits! But I know some of you like to keep track (or need to for dietary reasons), so here’s the scoop on what’s in these tasty treats. Just remember – these numbers can vary based on your exact ingredients and how generous you are with that glaze!
Per Donut (based on 6 donuts per batch):
- Calories: About 285 – hey, that’s less than most bakery donuts!
- Sugar: 25g (most comes from the glaze – you can reduce this by making a thinner glaze layer)
- Sodium: 180mg
- Fat: 8g total (4.5g saturated from all that delicious butter)
- Carbs: 50g (includes 2g fiber from the cocoa powder)
- Protein: 5g (thanks to the egg and dairy!)
Important note: These are estimates based on standard ingredients. Using low-fat milk or sugar substitutes will change things! Also – sprinkles and nuts add extra calories that aren’t included here (but totally worth it in my opinion).
My philosophy? Everything in moderation. One of these donuts with your morning coffee is a perfectly reasonable treat – especially since they’re baked, not fried! And hey, cocoa powder has antioxidants, right? That’s what I tell myself anyway…
Frequently Asked Questions
I’ve gotten so many questions about these baked chocolate donuts over the years – here are the ones that pop up most often! Save yourself some trial and error with these handy answers.
Q: Can I freeze these donuts?
Absolutely! Just make sure to freeze them without the glaze. Place cooled donuts in a single layer on a baking sheet to freeze solid (about 2 hours), then transfer to a freezer bag. They’ll keep for up to 3 months. When you’re ready to eat, thaw at room temp for about an hour, then dip in freshly made glaze. Tastes just-baked!
Q: How long do they stay fresh?
Honestly? They rarely last more than a day in my house! But properly stored in an airtight container at room temp, glazed donuts stay good for about 24 hours (they start getting sticky after that). Unglazed donuts will keep for 2-3 days. Pro tip: A quick 10-second zap in the microwave makes day-old donuts taste fresh again!
Q: Can I make these without a donut pan?
Don’t own a donut pan? No worries! You’ve got options:
• Muffin tin: Fill greased cups halfway for donut “holes”
• Baking sheet: Pipe thick circles of batter (they’ll spread a bit)
• Mini loaf pan: Makes adorable rectangular “donut sticks”
They won’t have the classic ring shape, but they’ll taste just as amazing!
Q: My glaze is too runny/thick – help!
This is the most common hiccup! For runny glaze: whisk in powdered sugar 1 tbsp at a time until it coats a spoon thickly. For thick glaze: add milk drop by drop (seriously, go slow!) until it flows smoothly. The perfect consistency should slowly drip off a spoon but still cling to the donuts.
Q: Can I make these vegan?
You bet! I’ve successfully made them for my vegan friends by:
• Using plant-based milk (almond or oat work best)
• Substituting the egg with 1/4 cup applesauce or flax egg
• Using dairy-free yogurt and vegan butter
• Making glaze with powdered sugar, cocoa, and plant milk
They’re slightly denser but still totally delicious!
Enjoy Your Baked Chocolate Donuts!
Alright, my fellow chocolate lovers – it’s time to get baking! I can’t wait for you to experience the magic of these homemade baked chocolate donuts. There’s something so satisfying about pulling a tray of these beauties out of your own oven. That first bite through the shiny glaze into the tender, chocolatey center? Pure bliss.
Don’t be shy about making these your own – toss on some crazy toppings, try a different glaze, or even sneak in some espresso powder if you’re feeling fancy. That’s the joy of homemade treats! And please, please tag me if you share photos – I live for seeing your creations (and stealing your brilliant ideas for my next batch).
Whether you’re making these for a special occasion or just because it’s Tuesday, I hope these donuts bring you as much joy as they’ve brought me and my family. Now go preheat that oven – your perfect chocolate donuts are waiting!
Print
Irresistible Baked Chocolate Donuts in 30 Minutes Flat
- Total Time: 27 minutes
- Yield: 6 donuts 1x
- Diet: Vegetarian
Description
Homemade baked chocolate donuts with a rich chocolate glaze, perfect for a sweet treat.
Ingredients
- 1 cup all-purpose flour
- 1/3 cup unsweetened cocoa powder
- 1/2 cup granulated sugar
- 1 teaspoon baking powder
- 1/2 teaspoon baking soda
- 1/4 teaspoon salt
- 1/2 cup milk
- 1/4 cup sour cream or plain Greek yogurt
- 1 large egg
- 2 tablespoons unsalted butter, melted
- 1 teaspoon vanilla extract
- 1 cup powdered sugar (for glaze)
- 2 tablespoons unsweetened cocoa powder (for glaze)
- 2 tablespoons milk, plus more as needed (for glaze)
- 1/2 teaspoon vanilla extract (for glaze)
- 1 tablespoon melted butter (for glaze)
- Chopped nuts or rainbow sprinkles (optional)
Instructions
- Preheat oven to 350°F.
- Spray a donut pan with nonstick cooking spray.
- In a large bowl, whisk together flour, cocoa powder, sugar, baking powder, baking soda, and salt.
- In a separate bowl, whisk together milk, sour cream, egg, melted butter, and vanilla.
- Pour wet ingredients into dry ingredients and stir until just combined. Do not overmix.
- Spoon or pipe batter into the pan, filling each cavity about 3/4 full.
- Bake for 10–12 minutes, or until donuts spring back when touched.
- Cool in pan for 5 minutes, then transfer to a wire rack.
- For the glaze, whisk powdered sugar, cocoa powder, milk, vanilla, and melted butter until smooth.
- Dip cooled donuts in glaze and add toppings if desired.
- Let glaze set before serving.
Notes
- Use Greek yogurt for a tangier taste.
- Adjust glaze thickness with extra milk if needed.
- Sprinkle toppings immediately for better adhesion.
- Prep Time: 15 minutes
- Cook Time: 12 minutes
- Category: Dessert
- Method: Baking
- Cuisine: American
Nutrition
- Serving Size: 1 donut
- Calories: 285
- Sugar: 25g
- Sodium: 180mg
- Fat: 8g
- Saturated Fat: 4.5g
- Unsaturated Fat: 2.5g
- Trans Fat: 0g
- Carbohydrates: 50g
- Fiber: 2g
- Protein: 5g
- Cholesterol: 45mg
Keywords: Baked Chocolate Donuts, Homemade chocolate donuts, Easy donut recipe, Chocolate donut recipe, Baked donuts, Chocolate glaze