Oh my goodness, you guys—this Biscoff cheesecake is my latest obsession, and once you try it, you’ll understand why! Picture this: creamy, dreamy cheesecake filling swirled with rich cookie butter, all nestled in a crunchy Biscoff crust. No oven required—just pure indulgence that comes together in minutes (plus some patience while it chills).
I first fell in love with Biscoff cheesecake during a girls’ weekend when my friend Sarah brought over a slice from her favorite bakery. One bite of that caramelized cookie flavor mixed with velvety cream cheese, and I was hooked. After begging for the recipe (and getting politely declined), I spent weeks perfecting my own version at home. The secret? Using actual Lotus Biscoff biscuits in the crust AND swirling extra cookie butter right through the middle—because why choose when you can have both?
What makes this dessert truly special is how effortlessly fancy it looks while being ridiculously easy to make. Whether you’re hosting book club or just treating yourself on a Tuesday night, this no-bake Biscoff cheesecake delivers restaurant-quality wow factor with minimal effort. Trust me—your spoon will keep coming back for “just one more bite” until suddenly… the whole pan’s gone!
Why You’ll Love This Biscoff Cheesecake
Let me count the ways this dessert will steal your heart (and probably your waistline)! First off, it’s the perfect lazy baker’s dream—no oven, no fuss, just pure cookie butter bliss. Here’s what makes it irresistible:
- No-bake magic: Skip the water baths and cracked tops of traditional cheesecakes. This beauty sets up perfectly in your fridge while you Netflix binge.
- Cookie overload: We’re talking Biscoff in the crust, Biscoff in the filling, Biscoff on top… basically a cookie butter hug in dessert form.
- Foolproof texture: The whipped cream folded into the filling makes it impossibly light yet decadently creamy—no rubbery cheesecake disasters here!
- Instant wow factor: Those pretty Lotus biscuits arranged on top? They make it look like you spent hours when really, you spent more time deciding which pajamas to wear while making it.
Seriously, this is the dessert that’ll have friends begging for your “secret recipe” while you smirk knowing how easy it was.
Ingredients for Biscoff Cheesecake
Okay, let’s talk ingredients—this is where the magic starts! I’ve learned through many (many) test batches that quality matters here. Don’t skimp on the good stuff, especially when we’re talking about that glorious cookie butter flavor. Here’s everything you’ll need:
- For the crust:
- 2 cups Biscoff cookie crumbs (about 24 cookies pulsed fine—trust me, measure after crushing)
- 6 tablespoons unsalted butter, melted (the real stuff, none of that margarine business)
- 1 tablespoon brown sugar (this little bit makes the crust sing)
- For the filling:
- 16 ounces cream cheese, softened (leave it out for 2 hours—no shortcuts here!)
- 3/4 cup Biscoff cookie butter spread (the smooth kind, not crunchy)
- 3/4 cup powdered sugar (sifted if you’re fancy)
- 1 teaspoon vanilla extract (the good stuff makes a difference)
- 1 1/4 cups heavy whipping cream, cold (straight from the fridge, please)
- 1/3 cup Biscoff cookie butter spread, slightly warmed (for that dreamy swirl)
- For topping:
- 1/2 cup heavy whipping cream
- 2 tablespoons powdered sugar
- 2 tablespoons Biscoff cookie butter spread
- 8-10 Lotus Biscoff biscuits (for that gorgeous crown on top)
- 2 tablespoons crushed Biscoff crumbs (because more is more)
Pro tip: Buy an extra pack of Biscoff cookies—you’ll want to snack while you bake! And yes, that’s three different uses of cookie butter in one recipe. I told you we weren’t messing around with this flavor.
How to Make Biscoff Cheesecake
Alright, let’s get to the fun part—making this dreamy dessert! Don’t let the layers intimidate you; we’re taking it step by step. Just follow along, and before you know it, you’ll have a showstopper chilling in your fridge.
Preparing the Crust
First things first—that buttery, crunchy foundation! Grab your loaf pan and line it with parchment paper, leaving some overhang (this is your future self’s lifeline for easy removal). Mix those golden Biscoff crumbs with melted butter and brown sugar until it looks like wet sand. Now here’s the key: press it firmly into the pan, going slightly up the sides. I mean business—really pack it down with the back of a spoon or your fingers. Pop it in the fridge to set while we work on the filling. This chilling time helps prevent a crumbly disaster later!
Making the Filling
Now for the creamy magic! Beat your room-temperature cream cheese until it’s completely smooth—no lumps allowed. Add in the Biscoff spread, powdered sugar, and vanilla, then whip it all together until fluffy. In another bowl, whip that cold heavy cream to stiff peaks (tip: chill your bowl and beaters first for best results). Here’s where patience pays off: gently fold the whipped cream into the Biscoff mixture in three additions. Don’t rush this—we want to keep all that airiness for the perfect light texture.
Layering and Swirling
Time to build! Spoon half the filling over your chilled crust and smooth it out. Now, warm that extra Biscoff spread just enough to drizzle—about 15 seconds in the microwave does it. Use a spoon to artfully (or messily—both work!) swirl it over the first layer. Top with the remaining filling, sealing the edges so the swirl stays hidden until that first glorious slice. Smooth the top like you’re frosting a cake—this will be your canvas for the final decorations.
Topping and Chilling
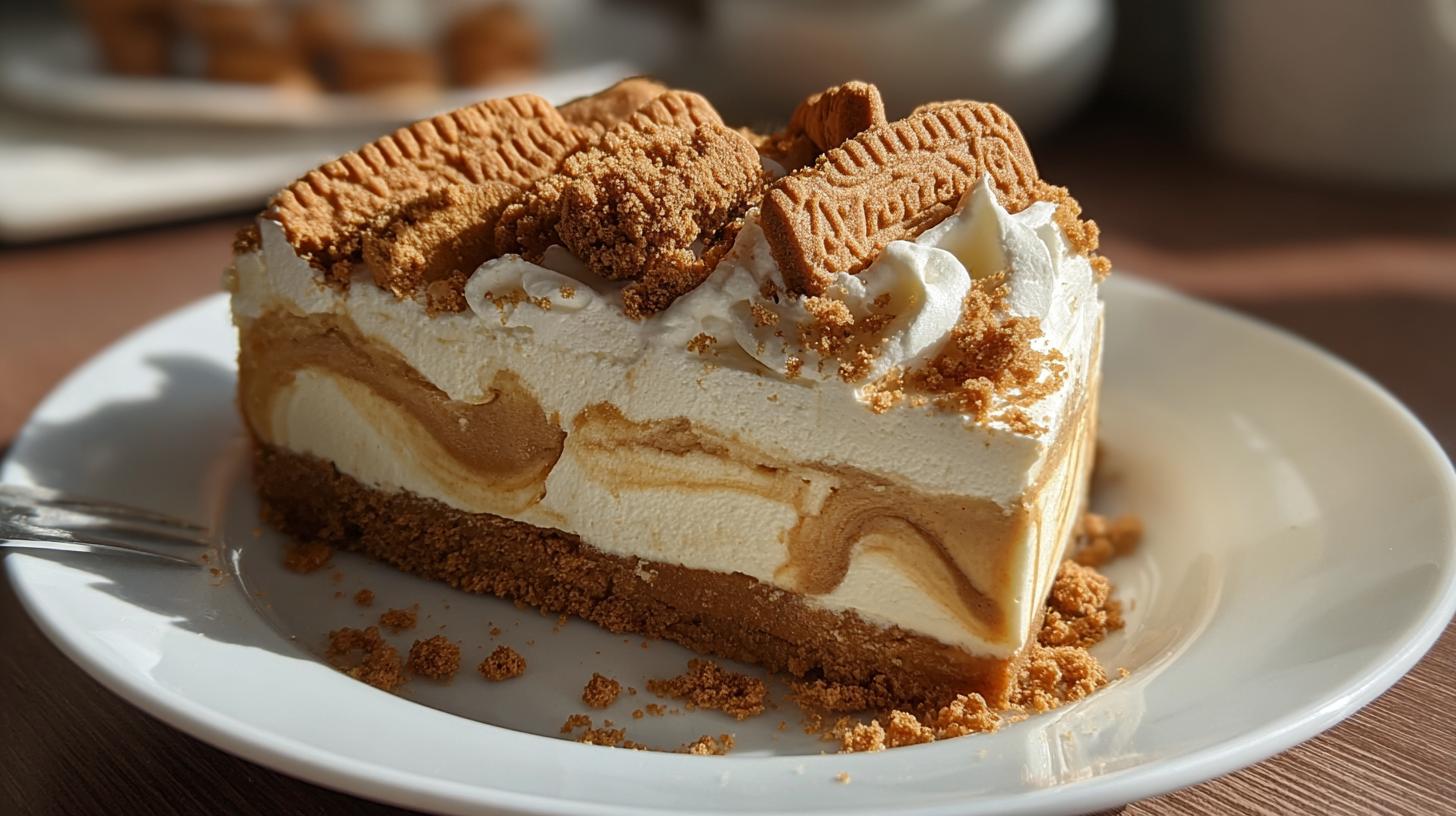
Almost there! Whip up the remaining cream and powdered sugar to soft peaks, then fold in that last bit of Biscoff spread for a lightly flavored cloud. Spread it over the cheesecake with love. Arrange those signature Lotus biscuits across the top—I like to stand them up like little sails—and sprinkle the edges with crushed crumbs for extra crunch. Now the hardest part: cover and chill for at least 6 hours, but overnight is even better. Trust me, the wait is worth it when you lift out that perfect slice!
Tips for the Perfect Biscoff Cheesecake
After making this cheesecake more times than I can count (purely for “research,” of course), I’ve picked up some game-changing tricks:
- Patience with cream cheese: Let it sit out until it’s truly room temp—no microwave shortcuts! Cold cream cheese = lumpy filling, and we’re not about that life.
- Swirl like a pro: Warm your extra Biscoff spread just enough to drizzle easily, but not so much it melts into the filling. I use a toothpick to marble it for Instagram-worthy layers.
- Slice smart: Run your knife under hot water and wipe between cuts—you’ll get clean slices that show off all those beautiful swirls.
- Flavor boost: Add a pinch of cinnamon to the crust or a splash of espresso powder to the filling for next-level depth.
Remember: good things come to those who chill (literally). Don’t rush the fridge time—it makes all the difference!
Serving and Storing Biscoff Cheesecake
Oh, the grand finale—serving this beauty! I love plating each slice with an extra Lotus biscuit on the side and maybe a drizzle of melted cookie butter if I’m feeling fancy. A dusting of cinnamon or cocoa powder looks gorgeous too. Leftovers? Ha! But just in case, cover it tightly and refrigerate for up to 3 days (though the crust gets softer over time). Pro tip: Let slices sit at room temp for 10 minutes before serving—that creamy filling becomes even more dreamy!
Biscoff Cheesecake Variations
Want to mix things up? Try swirling melted chocolate through the filling for a cookies-and-cream vibe, or add salted caramel between layers for sweet-salty perfection. Feeling adventurous? Mix crushed speculoos cookies into the filling or top with chocolate-dipped Biscoff biscuits. The possibilities are endless—this recipe loves playing dress-up!
Nutritional Information
Here’s the scoop on what’s in each heavenly slice (but let’s be real—you’re not counting calories with this one!): Each serving has about 520 calories, 36g fat, and 45g carbs. Remember, these are estimates and will vary based on the specific brands you use. Now go enjoy that cookie butter goodness!
FAQs About Biscoff Cheesecake
Can I use peanut butter instead of Biscoff spread?
Oh honey, I get it—sometimes you’re out of cookie butter and desperate! While peanut butter will work in a pinch, it won’t give you that signature caramelized Biscoff flavor. If you must substitute, try mixing peanut butter with a tablespoon of molasses and a pinch of cinnamon to mimic that spiced sweetness.
How do I prevent a soggy crust?
Two words: pack tight! Really press that crumb mixture into the pan like you’re mad at it. Chilling the crust before adding filling is crucial—it gives the butter time to firm up. Also, make sure your filling isn’t too warm when you pour it over.
Can I freeze this no-bake Biscoff cheesecake?
Absolutely! Wrap individual slices tightly in plastic wrap, then foil. They’ll keep for about a month. Thaw in the fridge overnight—the texture stays perfect. Bonus: frozen slices make amazing ice cream sandwiches!
Why did my filling turn out lumpy?
Room temperature cream cheese is non-negotiable! Cold cream cheese won’t blend smoothly no matter how hard you beat it. Also, scrape the bowl often—hidden lumps love to lurk at the bottom.
Final Thoughts
There you have it—my foolproof ticket to Biscoff bliss! I can’t wait for you to experience that first creamy, cookie-packed bite. When you make it (because you totally will), snap a pic and tag me—I live for your kitchen victories! Now go forth and spread the cookie butter joy.
Print
“Dreamy Biscoff Cheesecake Recipe with 3 Layers of Bliss”
- Total Time: 6 hours 25 minutes
- Yield: 8 servings 1x
- Diet: Vegetarian
Description
A creamy no-bake Biscoff cheesecake with a cookie crust, swirled with cookie butter and topped with whipped cream and Lotus biscuits.
Ingredients
- 2 cups Biscoff cookie crumbs
- 6 tablespoons unsalted butter, melted
- 1 tablespoon brown sugar
- 16 ounces cream cheese, softened
- 3/4 cup Biscoff cookie butter spread
- 3/4 cup powdered sugar
- 1 teaspoon vanilla extract
- 1 and 1/4 cups heavy whipping cream, cold
- 1/3 cup Biscoff cookie butter spread, slightly warmed
- 1/2 cup heavy whipping cream
- 2 tablespoons powdered sugar
- 2 tablespoons Biscoff cookie butter spread
- 8 to 10 Lotus Biscoff biscuits
- 2 tablespoons crushed Biscoff crumbs
Instructions
- Line a 9×5-inch loaf pan with parchment paper, leaving enough overhang to lift the cheesecake out later.
- In a medium bowl, mix the Biscoff cookie crumbs, melted butter, and brown sugar until the crumbs are evenly coated.
- Press the crumb mixture firmly into the bottom and slightly up the sides of the loaf pan. Place it in the refrigerator to chill while you make the filling.
- In a large bowl, beat the cream cheese until smooth and creamy.
- Add the Biscoff spread, powdered sugar, and vanilla extract, then beat again until fully combined and fluffy.
- In a separate bowl, whip the cold heavy cream to stiff peaks.
- Gently fold the whipped cream into the Biscoff cream cheese mixture until smooth and light.
- Spoon half of the filling over the chilled crust and smooth it out evenly.
- Drizzle the warmed Biscoff spread over the filling to create the center swirl layer.
- Spread the remaining filling on top and smooth the surface.
- In a small bowl, whip the heavy cream and powdered sugar until soft peaks form, then fold in the Biscoff spread for a light topping cream.
- Spread the topping over the cheesecake.
- Arrange the Lotus Biscoff biscuits in a neat layer across the top and sprinkle the edges with crushed Biscoff crumbs.
- Cover and chill for at least 6 hours, or overnight, until fully set.
- Lift the cheesecake out of the pan, slice, and serve cold.
Notes
- Chill the cheesecake thoroughly for easier slicing.
- Use room-temperature cream cheese for a smooth filling.
- For a stronger Biscoff flavor, add extra cookie butter swirls.
- Prep Time: 25 minutes
- Cook Time: 0 minutes
- Category: Dessert
- Method: No-Bake
- Cuisine: International
Nutrition
- Serving Size: 1 slice
- Calories: 520
- Sugar: 35g
- Sodium: 220mg
- Fat: 36g
- Saturated Fat: 18g
- Unsaturated Fat: 14g
- Trans Fat: 0g
- Carbohydrates: 45g
- Fiber: 1g
- Protein: 5g
- Cholesterol: 80mg
Keywords: Biscoff cheesecake, no-bake Biscoff cheesecake, cookie butter cheesecake, Lotus biscuit cake, Biscoff cream dessert, easy cheesecake loaf