
Oh, you’re going to love these mini cherry cheesecakes! I’ve been making this no-bake version for years—it’s my go-to dessert when I need something impressive but don’t want to turn on the oven. Picture this: buttery graham cracker crust, cloud-like creamy filling, and that gorgeous cherry topping that makes everyone’s eyes light up. The best part? They’re perfectly portioned for parties, potlucks, or just satisfying your midnight cheesecake cravings without committing to a whole slice. Trust me, once you try these little bites of heaven, you’ll understand why I always make extras—they disappear faster than you can say “cheesecake!”
Why You’ll Love These Mini Cherry Cheesecakes
Let me tell you why these little beauties have stolen so many hearts (and stomachs) over the years:
- No oven required – perfect for hot summer days or when you just can’t be bothered to bake
- Party-perfect size – no slicing mess, just grab-and-go deliciousness
- Creamier than a cloud – the whipped cream folded into the filling makes it impossibly light yet rich
- Make-ahead magic – they actually taste better after chilling overnight (if you can resist that long!)
- Customizable cuteness – dress them up with fresh cherries or keep it simple with just the glossy topping
Honestly, I’ve brought these to countless gatherings, and someone always asks for the recipe. They’re that good!
Ingredients for Mini Cherry Cheesecakes
Gathering your ingredients is the first step to cheesecake bliss! Here’s everything you’ll need for these irresistible mini treats:
- 1 ½ cups graham cracker crumbs – I like to crush mine fresh for extra texture, but store-bought works too
- ¼ cup granulated sugar – this sweetens the crust just right
- ½ cup unsalted butter, melted – trust me, the butter makes the crust magical
- 16 oz cream cheese, softened – leave it out for at least an hour! Room temp is key for that silky smooth filling
- ½ cup powdered sugar – dissolves beautifully into the cream cheese
- 1 teaspoon vanilla extract – my secret weapon for depth of flavor
- 1 cup heavy whipping cream, whipped to stiff peaks – this gives the filling its dreamy lightness
- 1 ½ cups cherry pie filling or cherry compote – I sometimes splurge on the fancy jarred kind
- Fresh cherries (optional, for garnish) – makes them look extra special!
See? Nothing too fancy – just simple ingredients that come together to make something extraordinary. Now let’s get mixing!
How to Make Mini Cherry Cheesecakes
Alright, let’s dive into making these adorable cheesecakes! I’ve perfected this method through lots of trial and error (and happy taste-testing). Follow these steps, and you’ll have picture-perfect mini cheesecakes that’ll impress everyone.
Preparing the Graham Cracker Crust
First things first – that buttery crust! In a medium bowl, mix your graham cracker crumbs with the granulated sugar. Now, here’s my trick: drizzle in the melted butter slowly while stirring with a fork. You want every crumb coated but not swimming in butter. When it looks like wet sand, you’re golden!
Scoop about 1 tablespoon into each muffin liner (I use paper liners in a muffin tin for easy removal). Press firmly with the back of a spoon or your fingers – really pack it down! This prevents crumbling later. Pop them in the fridge for at least 15 minutes to set while you make the filling.
Making the Cheesecake Filling
Now for the star of the show! Beat your room-temperature cream cheese in a large bowl until it’s completely smooth – no lumps allowed! Scrape down the sides as needed. Gradually add the powdered sugar and vanilla, mixing until silky.
Here’s where magic happens: gently fold in your whipped cream. I do this in three additions, using a rubber spatula with big, sweeping motions. Don’t overmix – you want to keep all that airy lightness! The filling should be billowy and hold its shape when you lift the spatula.
Assembling and Chilling
Time to bring it all together! Spoon or pipe the filling over your chilled crusts, smoothing the tops with a knife or offset spatula. Pro tip: pipe from a bag for super neat presentation, or just spoon it in for rustic charm.
Now the hardest part – waiting! Chill for at least 2 hours (overnight is even better). The filling will firm up beautifully. Resist sneaking a taste – I know it’s tempting!
Adding the Cherry Topping
The grand finale! Right before serving, spoon about 1 tablespoon of cherry pie filling onto each cheesecake. If you’re feeling fancy, top with fresh cherries (stem on looks gorgeous) or a dusting of powdered sugar. That glossy red topping against the creamy white filling? Absolute perfection!
There you have it – mini cherry cheesecakes that look like they came from a bakery but were made with love in your own kitchen. Now watch them disappear!
Tips for Perfect Mini Cherry Cheesecakes
After making these dozens of times (okay, maybe hundreds), I’ve learned a few tricks that guarantee perfect mini cheesecakes every single time:
- Patience with cream cheese – Seriously, let it soften completely! Cold cream cheese = lumpy filling, and nobody wants that.
- Chill that crust – Those 15 minutes in the fridge make all the difference for a crust that holds together.
- Fold gently – Treat your whipped cream like a delicate cloud when mixing it into the filling.
- Wait to top – Add cherries just before serving so they don’t make the filling soggy.
- Storage smarts – Keep leftovers in an airtight container in the fridge – they’ll stay fresh for 3 days (if they last that long!).
Follow these simple tips, and you’ll be a mini cheesecake pro in no time!
Mini Cherry Cheesecakes Variations
Oh, the fun part – playing with flavors! While I adore the classic cherry version, sometimes I like to mix things up. Here are my favorite twists that always get rave reviews:
- Berry swap – Try blueberry or strawberry pie filling instead of cherries for a different fruity pop
- Chocolate lover’s dream – Swap graham crumbs for crushed Oreos in the crust (trust me, it’s heavenly)
- Citrus zing – Add a teaspoon of lemon zest to the filling for a bright, fresh flavor
- Nutty delight – Mix chopped pecans or almonds into the crust for extra crunch
- Chocolate drizzle – Melt some chocolate chips and zigzag over the top before adding fruit
The beauty of these mini cheesecakes? They’re like little canvases waiting for your creative touch!
Serving and Storing Mini Cherry Cheesecakes
Here’s the best way to enjoy your mini cherry cheesecakes – serve them chilled straight from the fridge! That cool, creamy texture is absolute perfection. I love arranging them on a pretty cake stand or tiered tray for parties – the red cherry topping makes such a cheerful display. If you’re feeling extra fancy, dust them with a bit of powdered sugar right before serving.
As for leftovers (if you’re lucky enough to have any!), just pop them in an airtight container in the fridge. They’ll stay delicious for about 3 days – though in my house, they never last that long! The crust might soften a tiny bit over time, but the flavor just gets better.
Mini Cherry Cheesecakes Nutrition
Let’s talk numbers – each of these little beauties packs about 310 calories, with that perfect balance of creamy richness and fruity sweetness. Keep in mind these are estimates, since your actual ingredients might vary slightly. The nutrition gods know I sometimes go heavier on the cherry topping (oops!). Whether you’re counting calories or just indulging, these mini cheesecakes are worth every delicious bite!
Frequently Asked Questions
I get asked about these mini cherry cheesecakes all the time! Here are the questions that pop up most often – with all my tried-and-true answers:
Can I freeze these no bake cheesecakes?
Absolutely! They freeze beautifully for up to 2 months. Just wrap each one individually in plastic wrap before freezing. Thaw overnight in the fridge and add fresh cherry topping before serving.
What other fruit toppings work besides cherry?
Oh, get creative! Blueberry pie filling makes gorgeous purple cheesecake bites, while strawberry gives a lovely pink hue. My friend swears by mango puree for a tropical twist. The possibilities are endless!
Can I make these ahead for a party?
That’s the beauty of this party dessert recipe! They actually taste better after chilling overnight. Just wait to add the cherry topping until right before serving to keep everything looking fresh.
Do I have to use muffin tins?
Not at all! I’ve used everything from mini tart pans to silicone molds. Just make sure whatever you use has some structure to hold the cheesecakes while they set.
Why is my filling lumpy?
Almost always means your cream cheese wasn’t soft enough. Next time, leave it out for a full hour – patience makes perfect cheesecake bites!
Share Your Mini Cherry Cheesecakes
I’d absolutely love to see your mini cherry cheesecake creations! Did you try a fun variation? Maybe add a special twist? Snap a photo and share it with me – there’s nothing more exciting than seeing how you’ve made this recipe your own. And hey, if you run into any questions while making them, just ask! I’m always happy to help troubleshoot or celebrate your baking wins. Now go forth and spread the cheesecake joy!
Print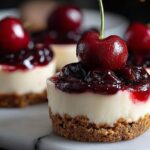
Irresistible 24 Mini Cherry Cheesecakes That Wow
- Total Time: 2 hours 25 minutes
- Yield: 12 mini cheesecakes 1x
- Diet: Vegetarian
Description
Delicious mini cherry cheesecakes with a graham cracker crust, creamy filling, and cherry topping.
Ingredients
- 1 ½ cups graham cracker crumbs
- ¼ cup granulated sugar
- ½ cup unsalted butter, melted
- 16 oz cream cheese, softened
- ½ cup powdered sugar
- 1 teaspoon vanilla extract
- 1 cup heavy whipping cream, whipped to stiff peaks
- 1 ½ cups cherry pie filling or cherry compote
- Fresh cherries (optional, for garnish)
Instructions
- In a bowl, mix graham cracker crumbs, sugar, and melted butter until combined.
- Press mixture firmly into the bottoms of mini cheesecake molds or muffin liners. Chill for 15 minutes.
- Beat cream cheese, powdered sugar, and vanilla until smooth and creamy.
- Gently fold in whipped cream until fully combined.
- Spoon or pipe cheesecake filling over chilled crusts and smooth the tops.
- Refrigerate for at least 2 hours until set.
- Top each mini cheesecake with cherry filling and garnish with fresh cherries if desired.
- Serve chilled.
Notes
- Use room-temperature cream cheese for smoother filling.
- Chill crust before adding filling for better texture.
- Store leftovers covered in the refrigerator.
- Prep Time: 25 minutes
- Cook Time: 0 minutes
- Category: Dessert
- Method: No Bake
- Cuisine: American
Nutrition
- Serving Size: 1 mini cheesecake
- Calories: 310
- Sugar: 22g
- Sodium: 180mg
- Fat: 22g
- Saturated Fat: 13g
- Unsaturated Fat: 7g
- Trans Fat: 0g
- Carbohydrates: 25g
- Fiber: 1g
- Protein: 5g
- Cholesterol: 65mg
Keywords: mini cherry cheesecakes, no bake cheesecake, mini cheesecake dessert, party dessert recipe, cheesecake bites, make ahead dessert